Whale Top!

Hello all!

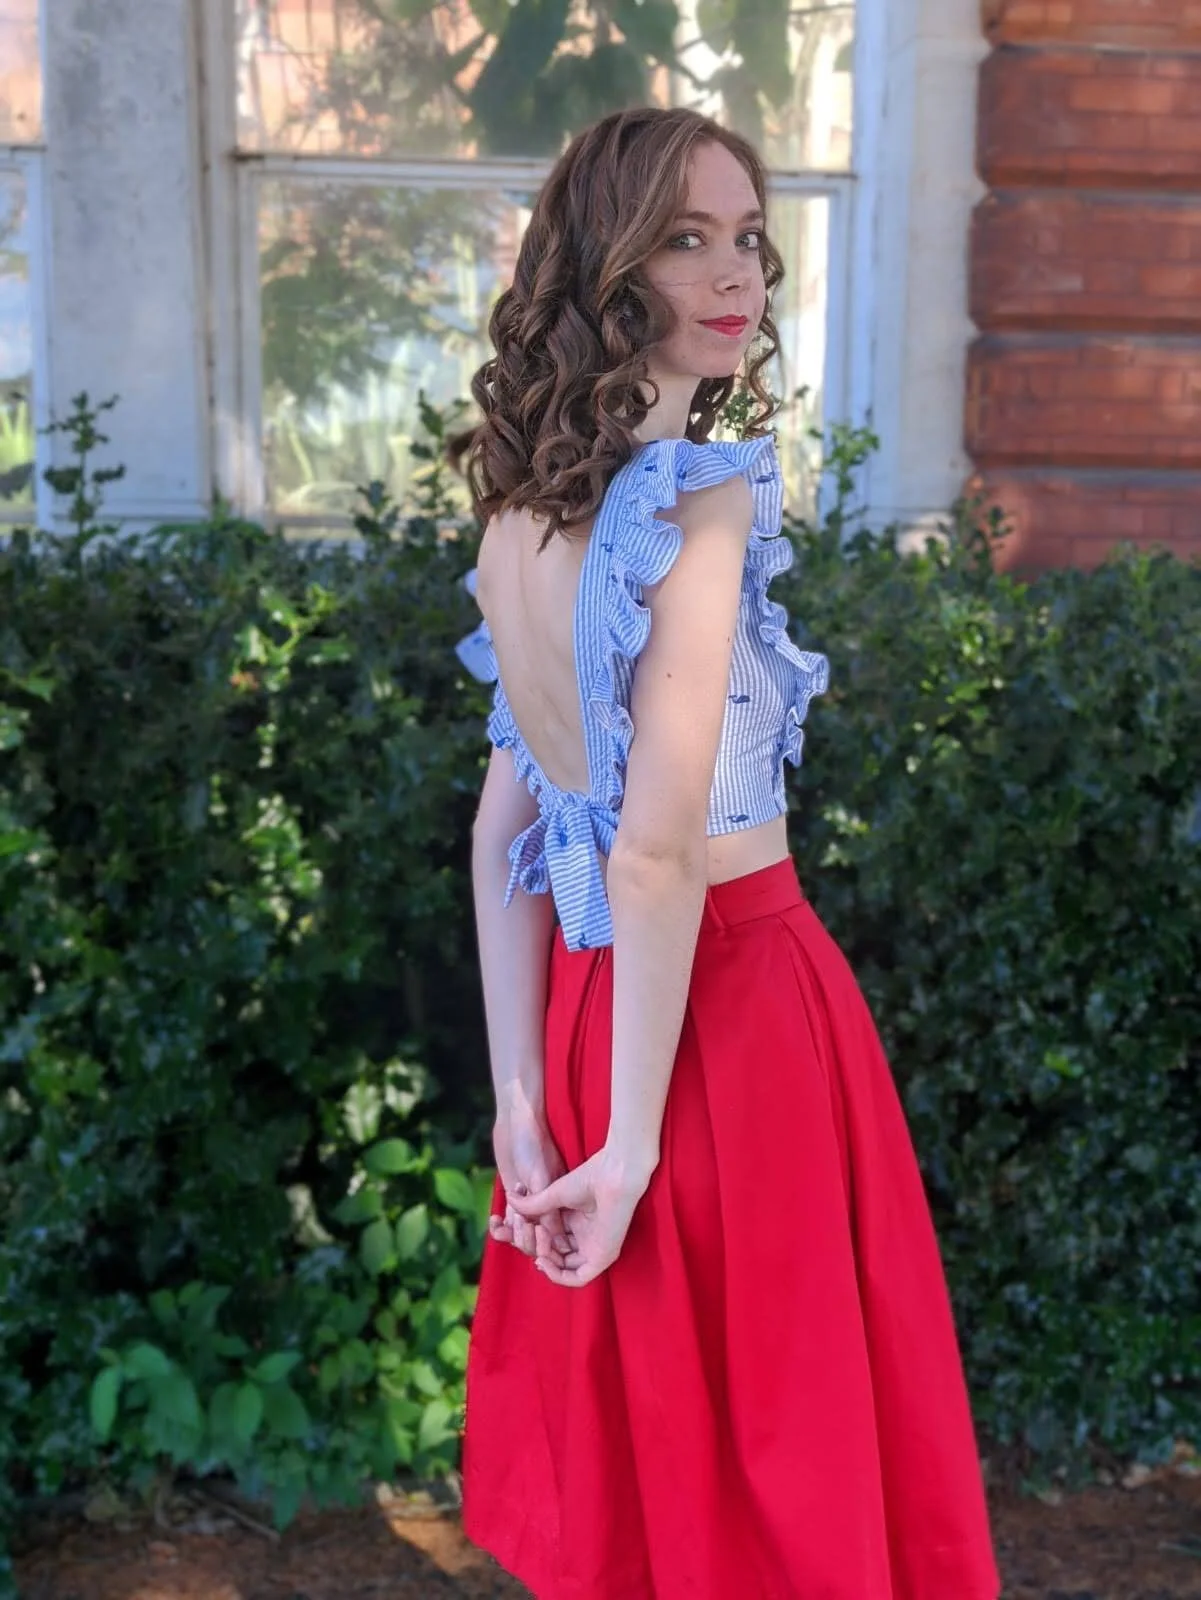
I recently sorted through all of my fabric and found a tiny pile of scraps left over from this Cleo Pinafore that I made with fabric from Minerva Crafts as part of the blogger network in 2017. I’d originally had the idea for this top in the summer of 2017 and went as far as to cut out some rectangles and gather up a frill, and then I must have been distracted by another shiny project! Luckily, in 2020 the idea of making a whale top with some ruffles appealed to me, so I made one!

IMG-20200730-WA0062.jpg

I ended up starting from scratch, purely because I’ve learnt some stuff in the last 3 years and I wanted this to be a win! I drafted a princess seamed bodice from my block with the princess line coming down from the shoulder. Then I measured the front princess seam to determine my frill length. I drew a rough shape for my frill, working out the maximum width of it and tapering down to nothing at the bottom. This was then slashed and spread so it doubled in height and could be gathered down to the original measurement.

IMG-20200730-WA0008.jpg

When I drafted the back of the bodice I also drafted a princess seam, discarding the majority of the centre back piece so that I could have some back on show. I did need some of the centre back piece however, so the ruffle could be sandwiched into the back princess seam. I took 5/8” out of the top of the back side seam tapering down to nothing as instructed by Suzy in her Building Patterns book to deal with low back necklines.

IMG-20200730-WA0058.jpg

The construction process was quite simple, but the alterations took a little bit of work. The shoulders were fiddled about with until they looked good. One of the issues is that the shoulder was too tight at my neck and so pushed downwards, making the back gape. It was crazy opening up the shoulder seam a bit to allow it to sit further up the shoulderline and watching all of the other issues disappear! I also redrew the armholes and took in the princess seams a little from the apex of the bust to the shoulder, to contour a bit more.

IMG-20200730-WA0026.jpg

All of the seams were overlocked and the raw edges finished with bias binding made from an old sheet. I need to do some more research on applying bias binding neatly to 90 degree angles.

IMG_20200721_125228442_HDR (2).jpg

Overall, I’m really pleased with this top turned out. It was a fun experiment to finally turn an old idea into an actual garment. I think next time I’d bring the side seam in a little. It sits very far back when it’s on the body because the ties are pulling it back, making the back more of a U shape than the straight down, across and up lines that I’d imagined. I also want to square off the front neckline a bit more. The frills do make me feel a bit like a dinosaur (the one that has a ruff all around his face), but I’m not mad about it!

IMG-20200730-WA0056.jpg

Thanks for reading!

Lauren xx

Adventures in Block Printing!

Hello all! I have a really fun project to share with you today. I’ve been wanting to have a go at block printing for a while, so I requested some block printing inks from my wonderful boyfriend as my anniversary present and my trusty Mum pulled out some rollers and assorted printing stuff out of the garage and I was all set to go!

The whole process started with trawling through Pinterest and deciding what I liked. I was very determined about printing something that I would wear. I ordered some ‘soft carve’ and had a lot of fun carving various shapes out, but in the end I kept it simple and only used 3. I spent a day printing everything and anything onto a sheet, but it just didn’t make me happy, so the next day I started again, this time focusing on 3 floral shapes. I changed my smooth roller to a foam one, put more ink on and tried to keep from mixing colours too much. It turns out mixing your own colours can be quite the learning curve!

IMG_20200718_113311615.jpg

For my second attempt I cut out my pattern pieces out of the old sheet that I was using as a base for my printing, with a fairly big seam allowance. This meant that I could centre my printing around these areas, instead of spending unnecessary hours printing a whole sheet. It also meant that I could hopefully avoid flower boob. I stuck with the 3 primary colours that I had and when I was done I looked at it, and it just didn’t fill me with the pride and joy that I wanted to feel when looking at it. My friend MK and I had an emergency conference call about how to rescue it and it was decided that purely the use of the 3 primary colours made it fairly child like. Primary school like, if you will. Also, there was too much white space.

IMG_20200715_144712871.jpg

So after adding in a few more colours and filling up the space, this is what it looked like! I was much much happier with it.

IMG_20200715_201519722.jpg

The pattern I drafted was inspired by this dress on pinterest. I loved the gathers going into the ties around the neck, so I used that as the main feature for my design. I used my bodice sloper as a base, rotating out the waist and side seam darts into the shoulder. This fullness is then gathered up when it’s tied around my neck. The skirt I used my skirt block for, slashing and spreading for the desired amount of fullness. When cutting out, I cut the skirt on a grainline halfway between the bias and the straight grain for a slightly drapier effect.

IMG-20200723-WA0028.jpg

I reckon that it took less time for me to sew together than it took for me to print it! The bodice is fully lined and bagged through the neckline and the lining is handsewn down at the waist seam. It is a very strange looking bodice shape. It reminds me of some rabbit books from my childhood?

IMG_20200723_173400404.jpg

I ended up narrowing the ties a bit, and also taking in the skirt at the waist because I was an idiot and forgot to check that the skirt and bodice waists actually measured the same. It was my first time putting in an invisible zip in ages, but it went fairly smoothly.

IMG-20200723-WA0026.jpg

I’m so pleased with the bodice fit. No gaping in sight! My only fit niggle is that I wish I’d cut the back in two pieces so I could have taken it in at the CB. I cut it on the fold so the print wouldn’t be disrupted, but I could have easily sewn the backs together and printed on them then, so would probably do that next time.

IMG-20200723-WA0039.jpg

All in all, it’s a very happy dress, and that’s exactly what I set out to achieve. Now the big question is, what am I going to print next?!

IMG-20200723-WA0057.jpg

Thanks for reading!

Lauren xx

Linen Buttondown Skirt

Hello all!

I really don’t have that many skirts in my wardrobe and this was part of my effort to remedy that. I bought the Apparel Arts Building Patterns book a few months ago (which is a pattern drafting book) and I’ve been making my way through drafting all of the different blocks. This project was the push I needed to draft the skirt block from this book.

IMG-20200711-WA0016.jpg

The pattern itself took no time to draft at all. It’s so nice to be able to use your measurements right from the start and know that it’s already going to fit better than a standard sized pattern. I extended the CF slightly to allow for the buttons and then it was time for cutting out!

IMG-20200711-WA0032.jpg

Fabric-wise I wanted to use leftover scraps of this blue linen, and I only just managed to eke the pattern pieces out by reducing the seam allowances from 1.5cm to 1cm. The sewing process went super quickly up until my housemate MK asked about pockets and I realised that it really needed them to make the skirt less boring. So then I went back to my linen, cut some pockets out, bagged them out with a nice floral lining, unpicked my side seams, topstitched them on and sewed my side seams back up. Voila, a much more interesting skirt.

IMG-20200711-WA0019.jpg

The buttons are repurposed from another dress that I never wore. The bottom button is missing due to a piggyback scenario on the walk in which these photos were taken. I really think the pockets and the buttons make this skirt!

IMG-20200711-WA0011.jpg

I do want to analyse these wrinkles from the back of the skirt and work out which issue they are indicating.

IMG-20200711-WA0015.jpg

All in all, its a really solid summer skirt and has fit seamlessly into my wardrobe! I’m currently imaging a longer version with flowing side slits…

IMG-20200711-WA0017.jpg

Thanks so much for reading!

Lauren xx

Stripy Linen Summer Dress

Hello all!

I made this dress all the way back in May out of a beautiful striped linen that I bought on holiday in New York last year. This was very high-stakes fabric and I really really wanted to make something out of it that I would love and wear for a very long time, which I think I’ve just about managed to do!

IMG-20200705-WA0000.jpg

I’ve been wanting to make my own version of a dress that Chriselle wore in 2016 and I thought that this stripy linen would pair perfectly with the sleek design to create the perfect simple and sophisticated summer dress. I adapted my bodice block and added my skirt block as it was, just extending the length to mid calf. The bodice of my curtain dress is actually an updated version of this pattern. The longest part of the process was the cutting out! I wanted to make sure that the stripes matched up at the waist seam and at the side seams of the skirt.

IMG-20200705-WA0006.jpg

My big mistake during the cutting out process was that I cut both the skirt front and back pieces on the fold, meaning that the zip would have to be in the side seam. This was an issue because my bodice goes past the side seam, in an effort to control gaping and to limit any boob exposure. To counter this I attached the bodice to the skirt up until the zip, and then an inch or so of the bodice is left free, which poppers to the skirt.

107073555_301671787618293_7864404847647490600_n.jpg

It’s strange how my scrubs sewing affected my personal sewing because I used the exact same method for my side slits! I made the hem quite deep to add weight to it so that it would hang more nicely. The bodice is finished with a facing (I used a scrap of white linen) and everything else was overlocked. There are 6 darts in total on the bodice, and I’m so pleased with how invisible they are!

IMG-20200705-WA0015.jpg

It took a bit of fitting to get the bodice to be wearable, and it could do with a tad more now really. I lowered the neckline 3cm, took 6cm total from the neckline width using a 2 darts and took 10cm from the side seams of the skirt to make it slightly more fitted. I think the neckline could definitely do with more being taken out of it, and the side of the bodice is still gapier than I would like. I tried to combat the side gaping by adding siilicone backed elastic to each side of the bodice but I think I need to stretch it slightly more for it to work.

IMG-20200705-WA0008.jpg

All in all, I love this dress. It really is the perfect holiday dress and I am so excited to eventually wear it in the sun and by the sea at some exotic location. When I finished the dress I was slightly concerned about giving off a Joseph in the nativity wearing his mum’s tea towel vibe, but I think I’ve just about managed to escape it! I’d love to make a more glamorous silk version in the future.

IMG-20200705-WA0025.jpg

Thanks so much for reading!

Lauren xx

Floral Gilbert Top

Hello all!

Today I have to show you my version of the newly released Helen’s Closet Patterns Gilbert top , for which I was part of the Quality Assurance team for last month! I made View A out of a floral cotton lawn remnant which was left over from a dress that I made for a show last year. I always tie up the fronts of my shirts, so it’s great that that detail is incorporated into the pattern!

IMG-20200613-WA0013.jpg

It was so nice to follow pattern instructions for once, instead of making it all up as I go along! Helen’s instructions were super easy to follow and it was great just relax and enjoy the sewing process. It’s a fairly simple top to make, but with enough details in it that you really feel like you’ve achieved something when you’ve got a finished top sitting in front of you.

IMG-20200613-WA0008.jpg

I’ve found myself reaching for it on the super sunny days where I just want something light and breezy to throw on, and the fact that it goes perfectly with my new shorts just seals the deal! I was a bit worried that my fabric choice was a bit vintage-y for me but I actually love this outfit and feel really fresh wearing it.

IMG-20200613-WA0021.jpg

In terms of changes that i’d make next time, I’d potentially shorten the sleeves and the body slightly. At the moment the ties rests nicely on my waist point and the side seams rest on my hip, so I would potentially shorten it so the side seam hem hits closer to my waist proportion wise. Or I can just tie it as tight as I feel that day as demonstrated below, tucking the ties up.

IMG-20200613-WA0001.jpg

Thank you so much for reading and to Helen for having me as part of the QA team!

Lauren xx