I did it! I drafted my own dress from scratch!

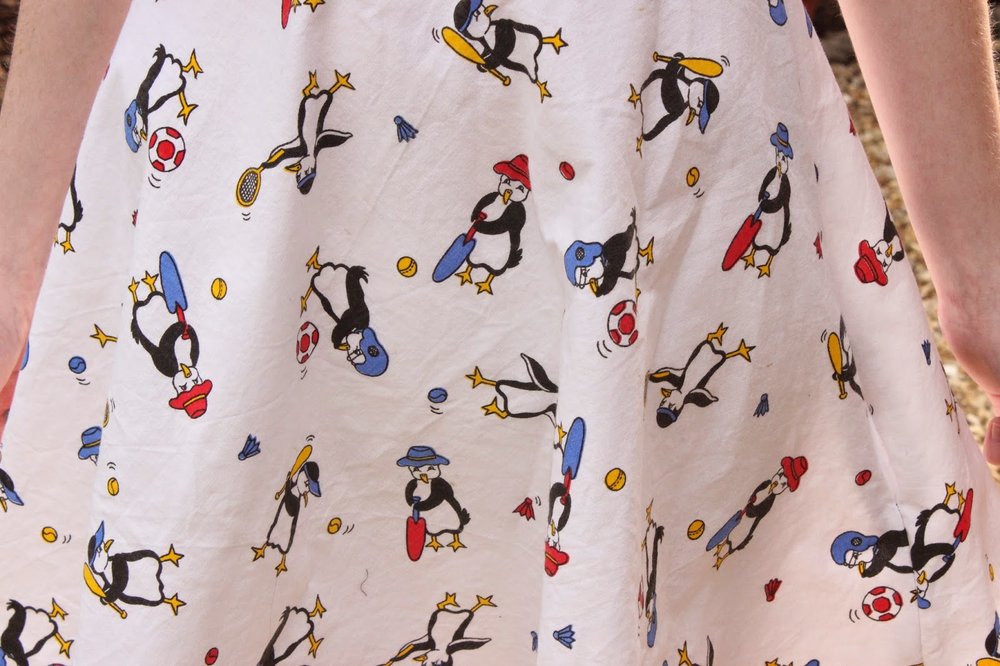
Hi everyone! This is my first self drafted dress using my own self drafted sloper! How cool is that! It also happens to be my entry for Sew Dolly Clackett because a) the fabric! and b) the silhouette. 
I drafted the bodice using my measurements and a pattern drafting book. After having a few hiccups and finding my bust size in the age 12 part of the childrens section, getting over the humiliation of that and guessing a few measurements it went okay. Ish. In my first muslin I took out about 2.5cm out of the centre front and a good 2cm out of each side and a wedge out of each shoulder. Hmm, I'm guessing that guessing measurements wasn't the best idea, but I got there in the end! 
Now I think I've got the bodice pretty much where I want it to be which is fab. The bust darts are a tad too high though so I'll alter that for the next version (because of course there's going to be a next version). The skirt is a half circle skirt which was calculated as usual via By Hand Londons app. Would you believe that I don't have a petticoat on underneath there? It is a tad short for my liking but I only had 1m and a bit to squeeze the whole thing out of. 
The fabric was one of the fantastic birthday presents from my friends (as well as other fabric, my own sewing labels, and for Christmas a vintage Singer, they are just THE BEST). I am a huge huge fan of penguins, a tad less enthusiastic about sport, but hey, this fabric is AWESOME! It's quite a stiff cotton which holds the shape of the skirt fantastically.
 The neckline, armholes and hem were all finished with varying colours and widths of bias binding and there's a white invisible zip inserted down the side.

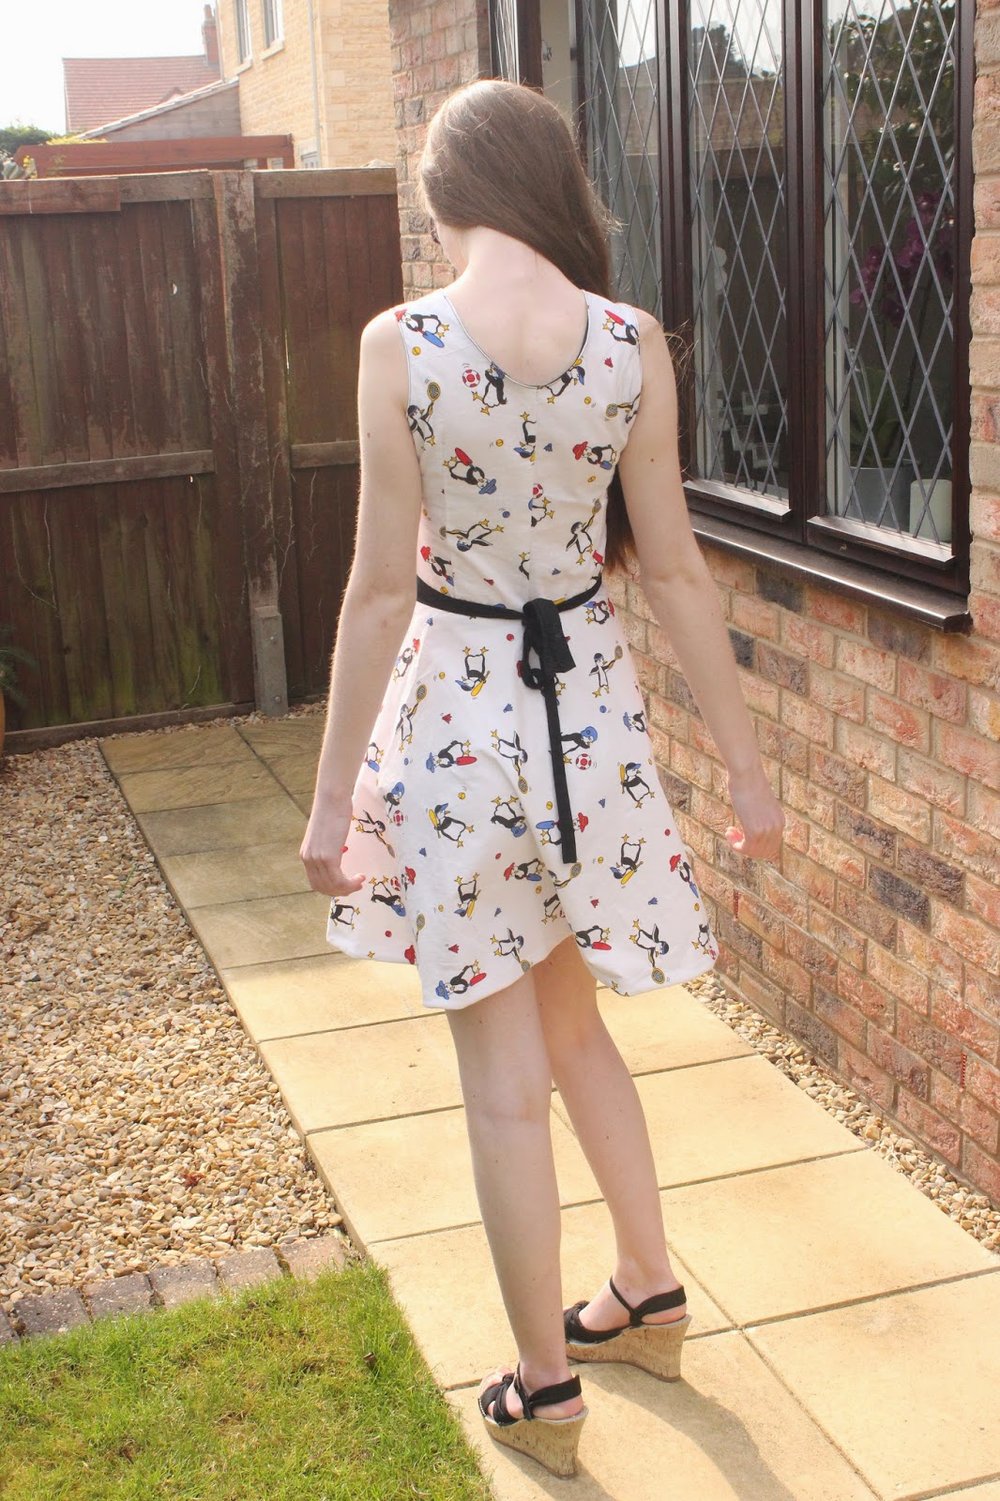
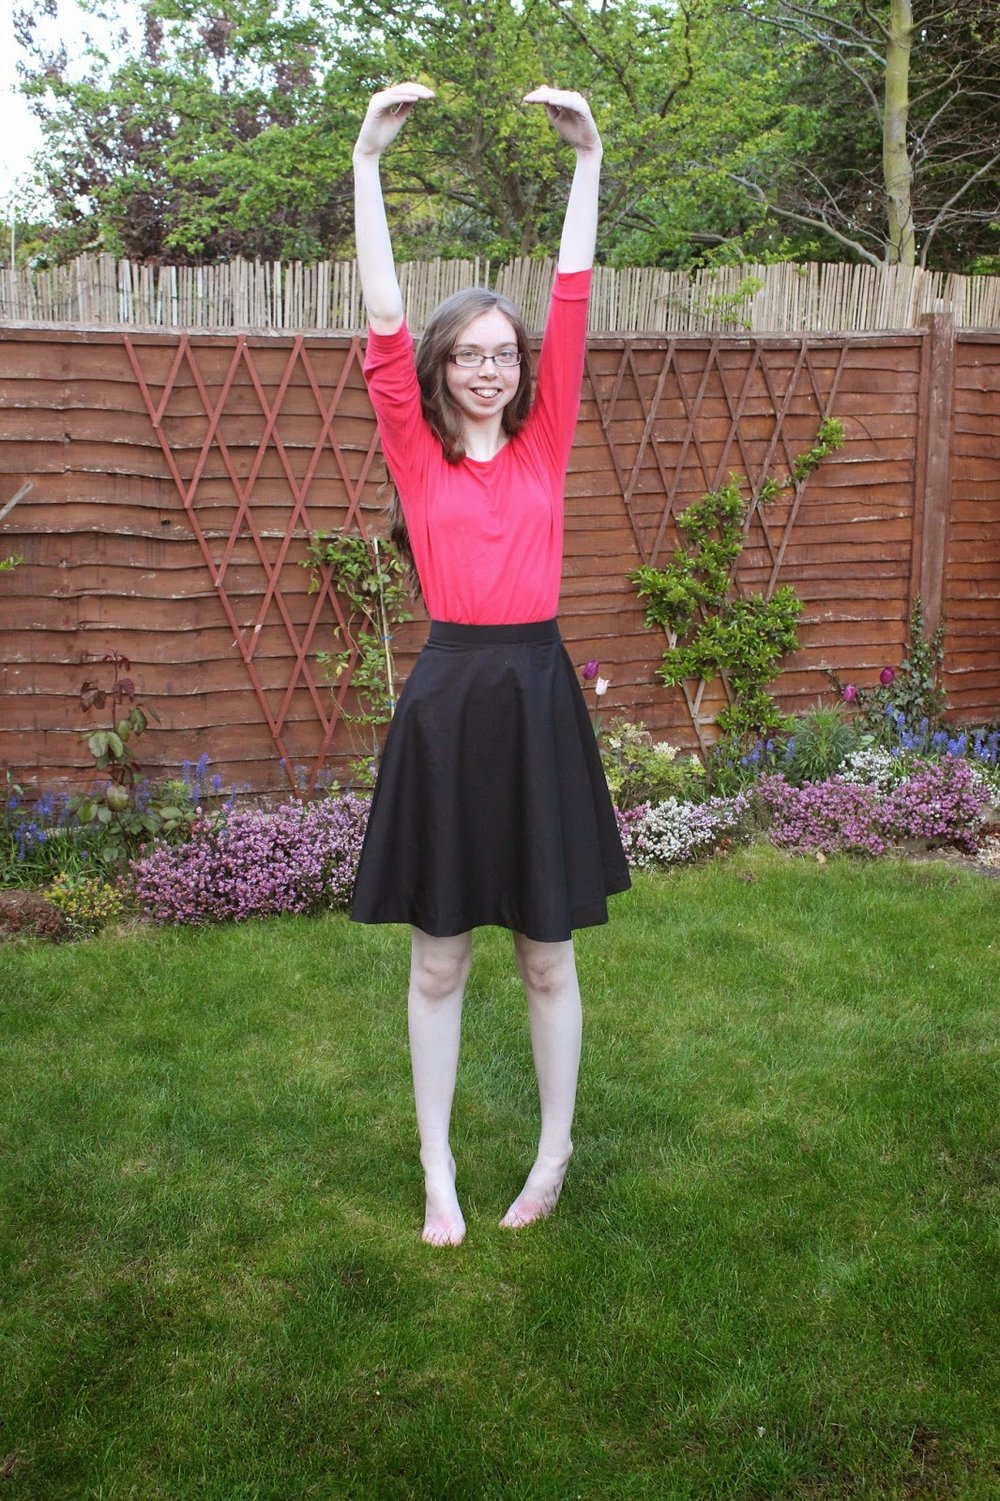
Despite many family members going, "Are you going to wear that, outside?" I obviously am. With pride. 
Thanks very much to Sarah for hosting this amazing event, and congratulations to Roisin and Nic!
Thanks so much for reading and to Ed for taking beautiful pics!
Lauren xx


Black Half Circle Skirt

Hi everyone! Just quickly, sorry for the poses. I guess you can tell I don't do ballet. It's like a warped version of the YMCA. However, the best pics of the skirt were the ones with me doing stupid stuff with my hands so these are the ones you get to see! My teeth also look funny in these photos. This would be because I got braces on Monday so adieu to all of my favourite foods for an entire year. But it's okay, because it's worth it for the end result.
 Anway, onto the actual sewing stuff... This skirt is a self drafted half circle skirt, with the measurements calculated by the By Hand London App. For the waistband I cut a rectangle the length of the top of the skirt and overlocked that raw edges together, then turned right side out and top-stitched. It's secured with an invisible zip and hemmed by machine 2 inches from the edge because I do not have the time to hand sew it and the machine stitching is invisible on the black anyway. The fabric is cotton poplin. 
The drape of circle skirts just make me feel all fuzzy inside. And now for twirly photos.
 This was a great basic to make as it goes with practically everything and was sorely needed in my wardrobe in time for Me Made May. I'd like to knock up another in navy to go with the other stuff in my wardrobe sometime soon.

Until next time, thank you very much for reading!
Thanks Ed for taking the photos!
Lauren xx

How I Lined my Pavot Blazer

Hi! As promised today I'm going to show you how I lined my Deer and Doe Pavot blazer. Just quickly, this was half guess work and is by no means the proper way to do it, but it is what worked for me.
First I cut out my lining using the same pattern pieces but adding fullness at the center back (an inch or so) to make a pleat and extending the sleeves 1cm to allow for movement.  Then I put the lining inside the outer wrong side to wrong side and sewed down the front, round the back of the neck and round the front again (basically where I've put my piping)
Then, turning everything inside out take the sleeves and match the seams, then pin and sew around the "hand hole".
When that's done, also pin the hem right sides together.
It should now look something like this:
When you've sewn all the bits you've just pinned unpick a 10cm gap in the middle of the sleeve which you then need to turn everything through. Now its time to interface the facing pieces and sew them together. I had to draft a new facing piece because I didn't need a buttonband but it's the same principle. I cut my interfacing smaller than the facing to make sure I wouldn't get any of the glue on the interfacing onto the iron.

When all 3 pieces are joined together the facing needs to be pinned and sewn to the coat/blazer right sides together. I didn't draft mine quite long enough so I had to add a bit to the end of mine, hence the weird seam at the bottom.
When this is done, clip the curves and turn to the inside of the coat/blazer and pin close to the edge. I then clipped the outer curves so I could turn the outer edge over to give a clean finish. 
The edge of the facing was then slip-stitched to the lining. Excuse the very green un-coordinating thread...

And now you can do this to random passers by..

Or not, your choice...

Hopefully that made sense! If it didn't don't hesitate to drop me a comment.
Thanks very much for reading!
Lauren xx

My First Suit!

As I'm 17, I'm required by law to go to school and at the moment I'm in a sixth form. In my sixth form, we do not have a uniform, but instead have a smart dress code which basically says that we have to wear a suit. And I've finally gotten round to making one. This suit cost me 5 pounds in total to make as the only things I paid for were the lining (3.50) and the piping cord (1.50) because the fabric was part of the huge pile given to me by my friends mum Irenee. Thanks Irenee!
The skirt pattern I used was New Look 6102 and I chose to line it by putting the outer inside the lining right side to right side and stitching all the way around the waistline. Then turn the lining inside the skirt, press and topstitch if there is no waistband. If there is a waistband raw edge of that could be tucked between the fashion fabric and the lining which will give a really clean finish. The lining was handsewn to the zip and both skirts were hemmed individually, the lining with the overlocker and the actual skirt with bias binding turned over and slip-stitched down. There is a waistband featured in the pattern, which I was fully intending to use, however it somehow ended up far too short, and I didn't have enough fabric to cut another, so waistband-less it was!


 I used the Deer and Doe Pavot coat pattern as a base, the same one pattern used for my red wool blazer also adding a full lining, however this time I ommited the buttonplacket (and the buttons) and the peter pan collar. I'm planning on doing a post later this week on showing how I added the lining as I couldn't find a tutorial in English anywhere. The buttons were removed because I found it such a faff doing all five of them up every time I want to take it on or off. Since I have 5 lessons a day, and I take my blazer off for each of them, the buttons had to go. For my last Pavot I wasn't atall happy with the fit, but I'm pleased to say that it's pretty much perfect now.
My previous school skirts are a real hassle to wear due to restricted movement so for this I extended my pattern piece so a little godet was formed at the back of the skirt. Rest assured, this allows PLENTY of movement.
Here is what the extension looked like:
Add of course, I had to put one of these beauties in there! Please excuse the stray green thread...


And finally I think this project can actually be part of the Sew for Victory because in the free download that Rochelle so generously uploaded for us there was a jacket practically identical to this one on page 15! I'm just going to ignore the fact that it was in the childrens section... Ooh and it also counts towards my vintage pattern pledge, BOOM! Two birds in one stone.
Hmm, I think this pose can only be carried off if the jacket is the same length as the sleeves... Oh well.


That's all I have to say for now so I hope you have a nice week!
Thanks very much to Ed for taking photos through your "snuffly as hell" phase and to Mercedes for taking supplementary photos where needed (No Ed it wasn't you, it was just my face that was the problem)
Lots of love,
Lauren xx

Stardust Dress

Every year for my birthday party I have a theme, and to my friends dismay we all have to dress up according to that theme. This years theme was heroes and villains and I went as Evaine from StardustIt was a really really big rush to get it finished in time, so much so that I was finishing the sleeves while 2 friends were making the sandwiches downstairs! This is why the hem isn't finished. I'm really not happy with how the dress looks though because it's just too short! Another 3 inches and it would be perfect! (And sorry about the lack of shoes- I didn't have any that matched and I doubted that a star that has just fallen out of the sky had time to put shoes on anyway)

However it is just amazing to twirl in... (all six metres of it) ((and thanks very much to all of my friends who contributed towards the fabric as part of my birthday present!!!))
and again...
Anyway, the pattern I used was style 2370 with altered sleeves.
Here are the inspiration pics I found on pinterest which you can find on my costumes board:
I was lucky enough to find the costume designers sketch which was really useful as I could see that I needed to add neckbands and sleevebands to the pattern as well as completely alter the sleeves.
“Yvaine” costume sketch from Stardust, costume designer Sammy Sheldon    From The Stardust Visual Companion

Stardust
And here's my version of this pic (bearing in mind that I didn't have a crater to pose in)
hmm maybe not.
The sleeves I messed up, a lot, quite a few times as I failed to realise that if I just drew lines straight out from the sleeve cap it wouldn't work because of the way it drapes. The way to do it properly is to make the sleeves extra long, put on mannequin and then slant them on the mannequin so they drape properly. Luckily I had enough fabric to do it again. The back is also all messed up for reasons that I shall explain in a minute.
Right, now to explain the mystery of the messed up back of the dress. One of my party surprises was a pinata which are really tricky little buggers to pin down. Like really tricky. We must of been outside for a good half hour, my poor friends shivering in the freezing 9pm January English weather. And, well, long story short my dress split from all my exertions in the back side seam rendering it indecent to wear for the rest of the night. That night I learnt a very important thing. This is why lumberjacks don't wear satin! Anyway, here are some pinata pics for your amusement!
And yes, to fit in with the theme they made it a superheroe pinata...
DIE PEDRO DIE!!!

Oh and I forgot to show you the speech that was the prelude to my surprise:
"DD (my nickname) we have got you a little something extra
its only for this very special occasion
his name is Pedro
we handpicked him ourselves
he is already paid for
we have protection for you
but be careful he is very hard
he is yours to do whatever you want with 
and has a sweet ass
he is waiting for you outside
Enjoy!"
As you can imagine I was quite apprehensive as I was led outside but it was great fun. Here is all of us on the night. Amongst us we had a Merida from Brave, Sherlock, Watson, Moriaty and Irene Adler from Sherlock the TV series and 2 other people that I can't remember who they were (oops)

 I think that's all I've got to say about this dress!
Thanks very much for reading this epic saga, turns out I had quite a lot to say. If anyone has any suggestions for next years party theme I'm all ears.