My Camden Lady Skater

I finally jumped on the Lady Skater bandwagon! This dress is has just got to be my favourite yet. I'm thinking this is 50% the fabric and 50% the pattern and the silhouette. It just makes me feel fab when wearing it which is what clothes should do. I scored the fabric in the remnant bin at Rolls and Rems in London where I went on a day trip to Camden with a friend and her Mum and we had an epic day. I also had my first bubble tea which was... an experience... 
It cost me 2.50 for around 1.5m of it with a few rectangles cut out of the edges, but I didn't have any trouble with fitting all the pattern pieces onto the fabric. This was the first time that I've ever pre-washed any of my fabric, but I really didn't want to waste my time and effort on something that I can only wear once because it shrinks in the wash. Washing it was fine. Drying however was an issue, because knit fabric has to be laid flat so it doesn't stretch out of shape. This is how I dealt with the issue:

It didn't really work because England in the winter isn't really warm enough to dry anything so it just ended up on my bed folded in half on top of a towel which seemed to work okay.
I did make a massive mistake and uses 5/8 seam allowances instead of 3/8 (idiot) so I unpicked the arm and side seams and sewed them up again using the right seam allowance, but left the shoulders at 5/8 because they seemed okay and I really didn't want to start all over again. I did cut out and sew in full length sleeves but they were too tight even with the right seam allowance so I cut them short. Next time I'll grade them up to a size 2 or 3.
I do have many more planned in the future! The photos were taken at Burghley House which is just beautiful. We did take some photos in front of the main house but they didn't turn out so well as these ones so I'll take some pics in front of the main house some other day. I'll definitely be going back as it's only 15mins away from our house.

Thanks to Ed for taking the pics, and thanks to Mum and Dad for treating us to brunch!
If you haven't voted yet for the sewalong project sewn entries here, you've got still time! If my dungarees were you're favourite, feel free to give them a heart!
Thanks for reading!
Lauren xx

My first blogaversary!

So, this little blog is 1 year old today. A lot has happened. I now know what a fly front zip is and I actually found something that I'm not that bad at, something that now I could not live without. The first project I blogged about was this tea-towel apron. Yep. I've come a long way since then. The eagle eyed amongst you may be going ,"but according to your blog archive starts in oct. 2013". Let me explain. I started out with a self hosted address which my brother (an I.T god) sorted out. But because it was hosted on a server in our house which has rubbish internet it was never up. And every time it went up again the I-P address changed and it was just a massive hassle and no one was reading my blog post which is kinda the point of a blog! So, I got a blogger account instead :)  
 I didn't know it was possible to learn so much in such a short period of time! I've really found my sense of style since I've been sewing because I've had to make the choices myself, instead of letting the shops choose for me. I love how easy sewing makes it for me to be an individual.
A while ago I was stuck because I didn't understand how fashion could be cost effective! How can people afford to buy a new wardrobe every season? And how can you just let go of your favourite clothes because they're not "in" anymore?! So now I use fashion purely as an inspiration, not caring about trends and when they end. If I like how it looks, that's enough for me.

The Stats

 I've apparently made 37 items of clothing this year, most of which being dresses. This year I want to branch out a bit more. Now I've figure out fly fronts I want to make some high-waisted jeans which seem to be impossible to find on the high street for a reasonable price. However, I think my perspective of pricing is slightly warped. I'll pick up a piece of clothing and calculate the how much it would cost if I made it and I nearly always put it back on the rail. It's just time that's an issue! I also want to figure out how on earth to make a button-up shirt, oh and a suit for sixth from. We'll see how this goes.


Onto wear-ability. I actually think it's pretty good that over 50% of the things that I've made this year are wearable, considering how most of the time I don't have a clue what I'm doing. Plus, I've learnt so much from every single one of these mistakes.


My most popular post this year was my plaid pinafore for quite a while (which is one of my favourites too) but since project sewn my most popular post is my Bridget Bardot inspired floral trousers which I feel uber sassy in, closely followed by my dotty woven strips dress.
This year I want to work on sustainability, making my garments a high a quality as possible, namely making sure they look pretty on the inside. I've also started pre-washing my fabric for the first time! I think Mum is proud that I finally know how to use the washing machine now.

Umm, I think that's all I have to say!
Oh, and the voting has just opened for the project sewn sewalong here, so if my floral dungarees were your favourite please give me a heart!
Thanks so much for reading!
Lauren xx

Floral Dungarees/ Overalls (Project Sewn week 4: Signature Style)

So this week is signature style. Did this make involve florals? Tick. Did it involve a full skirt (my favourite)? Nope, because I wanted to try something new, and I'm glad I did, because I love these dungarees, and I can't wait 'til summer so I can wear them properly without tights. I did order some proper copper dungaree clips but they didn't seem quite right to I omitted them. I'm pondering whether to add some white nautical anchor buttons in my stash instead though.
I used the same pattern that I used for last summers floral shorts which was the Simplicity 9944 trouser pattern shortened quite a bit and already altered to my size (Read: taken many inches off sides to accommodate non-existent hips). Last time I had an issue with tucks at the hem because when it was folded back as there was excess fabric because they are tapered. This time I fixed that by clipping the curves. I omitted the waistband and instead drafted a facing which I put the bib in between (so a sandwich of shorts, bib, facing). Next time, i'd prefer the shorts to sit at my natural waist, they sit a tad low at the moment. The bib was sewn 3 sides right sides together, turned right side out and topstitched. The raw edge went in the metaphorical sandwich.
The back straps are crossed because I think it looks cute.I did a machine sewn zipper in the back for the first time in ages because I accidentally sewed every seam closed. To get a really neat zipper I kept the stitches in the centre back seam in and pressed the seam allowance open. Then I place the zip on top front down on the wrong side or the CB seam and sewed down both sides and accross the bottom. Then I unpicked the centre back seam and ta-da a perfect machine stitched zipper! It was kinda inspired by all the fly front zippers I've been doing lately.
I was wondering whether to put white broderie anglais or black lace on the hem and the facebook vote was a resounding yes. However, turns out that I'm 2 inches short of broderie anglais, which was a bit of a dissapointment so that plan has been put on hold.
Photo: White broderie anglaise or black lace for the hem of my pinafore shorts? Or neither?!
I think that's all I've got to say for now (or all I can remember to say anyway!) so I'll get back to revising for my mock exams later this week. All I want to do is sew! Is that too much to ask for!!!
Anyway... I'll just leave you with my best model pose. (Yeah okay, I'm not quite there yet...)
Have a great week everybody!
Thanks very much for reading,
Lauren xx

Red Wool Blazer for "If the Shoe Fits" Project Sewn Challenge Week 3

 I've been looking for a cropped blazer to wear with all of my highwaisted stuff FOREVER. But they don't seem to exist any more so I adapted Deer and Does Pavot jacket pattern that I received for my birthday, my first indie pattern people! It is by no means perfect. The hem doesn't look even, the collar doesn't end at the right place and the buttonholes look disgusting. But I learnt how to do tons of new things. I've never bagged a jacket before, i've never made covered buttons before and I've never managed buttonholes that just work before now! So at least I've achieved something.

 I made the jacket cropped by just ignoring the skirt and waistband pattern pieces. In my muslin it was far too short, especially with the fact that I'd cut off the waistband and that I have a really long waist so I lengthened all the pattern pieces by 10cm which was perfect. My mock up didn't fit that well around the bust (whats new) and I stupidly discounted it for wearing ease. Now I wish I'd fit it properly.
Even though the pattern is unlined I didn't want to go to all the trouble of making a blazer without making it pretty inside. It was half guesswork and half looking at the pictures from these french instructions. Bagging a lining is like magic, it all works out, but ask me to explain how and I don't have a clue.

 I should probably talk about the shoes now. I NEVER wear high heels, for a number of reasons. a) I feel too young for heels. When I wear heels it's kinda like I'm playing dress up. b) I walk like a drunkard in theme even though I've never had a drop in my life (true story, alcohol smells DISGUSTING) and c) When/where would I wear them? School is a no-no. Parties are non-existent.
 But anyway, because I didn't own any shoes suitable for this challenge I asked Meghan who is the owner of many a wonderful pair of shoes if she had some I could borrow. These are perfect. I loved the red and navy colour scheme, which worked with the fabrics in my stash. Turns out grass is not the greatest texture to be walking on in stilettos. I guess you can see that I'm kinda a novice at this balancing thing, but I do feel kinda sassy in them when I'm stationary ;)

So in conclusion. This blazer was a great learning curve for me but lots of things let it down for me, mainly the fit, but hopefully I will get some wear out of it. The dotty dress was blogged about here. 

Thanks very much for reading, and voting for me in the last round!
And thanks very much to Meghan for letting me borrow her shoes and inspiring me to make this blazer in the first place!
Also thanks to Edward who took the photos in return for a marshmallow and chocolate sauce pancake which was a pretty good deal.
Lauren xx

Dotty Woven Strips Dress (for Project Sewn Make It Pink week)

Hello! This dress took a while, in fact I'm pretty sure I've never spent so long making anything, ever! The bodice was inspired by a woven strips sample that we did in our textiles lesson. When I saw that the 2nd round of Project Sewn is based on the colour pink, I thought oh, but I don't wear a lot of pink. This is true, I have next to none of it in my wardrobe. In my experience people either prefer pink or purple. I'm definitely a purple girl, but hey, I didn't want to miss out, so I did half pink and half white. However, I am slightly concerned about having a white skirt, being a dirt magnet and all... 
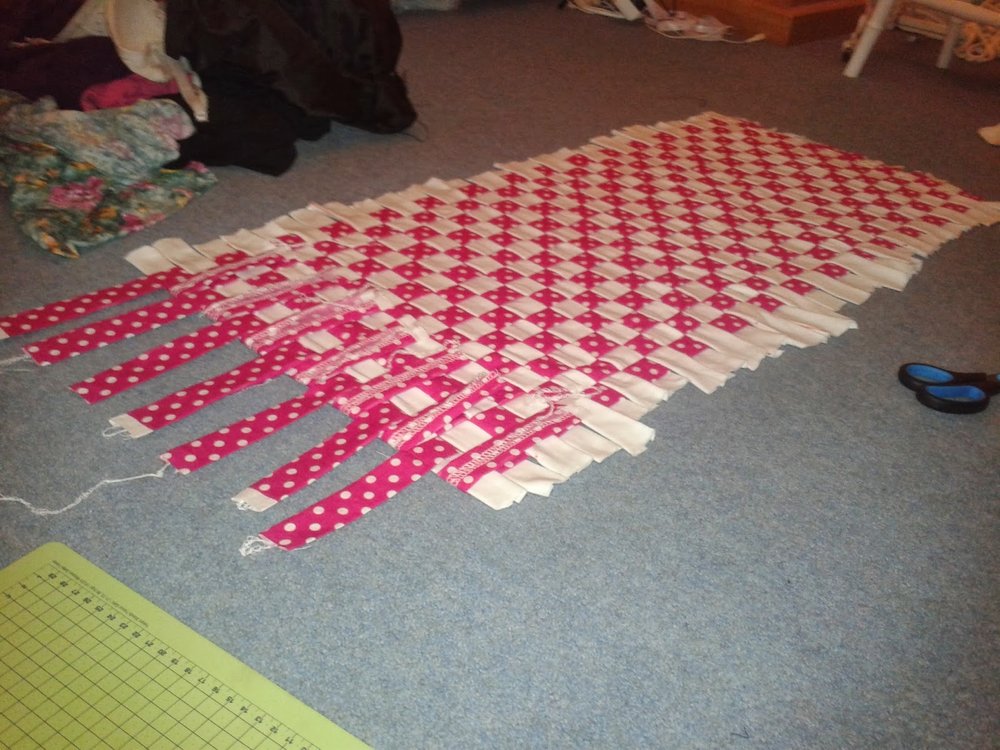
As usual, this project started off being nothing like what it finished as. In this instance I knew I wanted to use the woven strips technique (because it looks pretty cool) and it was going to be the front and back panels of a pencil skirt, the side panels being a contrasting white. I used 1m of pink polka dots and 1m of cotton jersey which when all stripped up and woven together only gave me a piece of fabric 50cm long, which is just a tad too short for a pencil skirt.

Back to the drawing board, I decided it would be suitable for a bodice. This bodice had to have darts in because no way was I going to match princess seams with these checks. (spoiler alert: i ended up matching up princess seams anyway). The darts weren't working out, I tried draping a darted bodice, instructions from a draping book that I recieved for my birthday (thanks Aunty Maureen and Uncle Mike!) but it didn't quite work out, and this was saturday. I didn't have time to mess around fixing it. I then turned to the darted bodices of the commercial patterns that I own. Long story short: when it says size 6 on the envelope IT'S LYING. Plus, I'm not keen on darts in bodices. I can never get rid of the pointy effect. So, in the end I just decided to use Very Easy Very Vogue 8651, cutting it off at the waist.
I then had to cut fairly big chunks out of the centre front and sides but it's Saturday lunch time and I have a muslin that fits! Yay! I then marked 5/8s from where I'd pinned it and then unpicked all of the seams (apart from the centre front) I then stitched the centre back pieces together so that was less pattern matching to worry about. This meant that I'd put my zip on the side seam instead of the back. The neckline then had to be lowered so I could get it over my head (this was post-picture) I then cut it out of my woven strips fabric but I couldn't for the life of me figure out how to pattern match curved seams. Is it even possible?! Anyway, In the end I just decided to do what I could and its not the best but hey-ho.
After cutting out the bodice pieces from my "woven strips fabric" I decided to underline it with some white cotton from an old sheet because it was a bit gappy. The issue that I then came across was how thick all of the layers are! If you think about it, each strip was ironed under 1cm and there are 2 strips on each square of the fabric. Add in this extra cotton layer and it was properly thick, impossible to pin! The neckline and the armholes were a bit of the issue and are not perfect. I used bias binding to finish the neckline, and this was okay as I only slipstitched it to the cotton underlining. The arm holes I just clipped the curves and turned over once. Not the prettiest but it worked.
One thing I should have done was sewn each strip down to make the fabric stable instead of just zigzaging the edges of each bodice piece because the strips keep folding over to the wrong side. I can always slip stitch them down when I have some spare time. For the skirt, I just cut out a circle skirt and attached it to the bodice. Ta-da and I'm done. Finally.

All in all, I really enjoyed this project, and thank you Project Sewn for helping me dream it up!

Thank you very much to Alex for gifting me the spotty fabric as my birthday present, this wouldn't have happened without you!

Thanks very much to Edward, my younger brother for taking the photos! He hasn't demanded any payment for them yet (which is good because I've run out of haribo!)

Thanks very much for reading!
Lauren xx