The Shrubbery Top

This top is named the shrubbery top for 2 reasons. a) it’s covered in leaves and b) pictures were literally taken in the shrubbery, or the leafy part of our garden anyhow. I’m not sure whether it’s too baggy but I think I like it how it is for now. I’ve decided to do a bit of list of the fabric I used and the techniques and all that lot, so I guess I’ll just jump right in.


Pattern: This is from the may 2013 edition of mums Prima magazine. Unfortunately their patterns start at size 10 and I’m quite a bit smaller than that. It just consists of 2 pattern pieces (a front and a back) which the sleeves are included in. I think this is called a dolman sleeve top?


Alterations: I’m pretty sure that I made a muslin, but I can’t for the life of me figure out where I put it. I think I took in about an inch from the middle of both the front and the back pieces and also an inch or two from the sides.
Fabric: The fabric was leftovers of some leafy cotton that I inherited from my mum. Apparently she made flared trousers out of it… There wasn’t enough for a full length top, which was alright because now I have my first ever crop top!


Techniques: This was the first time that I’ve ever used french seams, and I am so proud of the inside of this garment. There are no raw edges to be seen. I used bias binding for the first time for the neck, sleeves and hem which is also new to me.
The pic to your left gives you a fairly good idea of what it looks like from the inside.


Loads of thanks to Lauren who took the action shots!


Prom dress bodice wearable muslin


After changing the bodice completely I wanted to make another mock up to make sure that it fit okay. This time I wanted it to be a wearable one so I used a £2 remnant of dupion to make this dress. The bodice is simplicity 4070 and the skirt is 2 gathered rectangles. The bodice is fully lined as I wanted to make my insides as nice as possible.
And there’s my Dad in the shadow trying to take a picture.


I discovered that the arm holes wayyy too low so that was changed on the original pattern.


I had to use a white zip because that was the only one I had that was long enough. The machine stitching was awful even though I tacked it beforehand so I unpicked it and instead attempted a hand-picked zip for the fist time.


It’s still not perfect, but it’s much better than it was.


I’m glad that I made this dress as now I know exactly what I need to do to make my prom dress fit perfectly. All I need now is a party to wear it to…

I made a tie!


It was my dads birthday yesterday and the night before I thought “aha, I’ll make him a tie”. I scoured the internet for a pattern and found this by pukingpastilles.com which is perfect. It took longer than I thought it would to make, seeing as I sewed the pieces together all wrong and instead of going in a straight line it zigzaged. By 11pm I still hadn’t finished so I decided to take it into school the next day to finish off. After form period, biology, break, lunch and after school with the help of a friend I finished my tie. And I have to say, I’m quite proud of it really.
He loved it and even wore it to work to next day. At least he was wearing it when he came home.
It was a huge success and I can see me making many more in the future for male birthdays.

Prom Dress Mock Up

2013-03-23 16.35.00I as usual wanted to be different and what better way to make sure that no one wears the same dress as you, than to design and make your own! So here is the first stage of my development. It has evolved into many different things over the past few weeks but now I’m confidant that I have a design that I’m satisfied with and that I can actually reproduce with the amount of fabric I have.
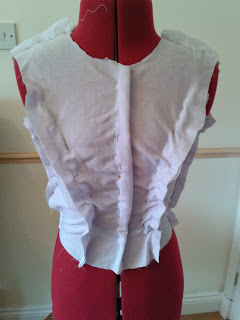
 I started off with a circle of fabric using a circle skirt formula, making it much shorter, gathered it and attached it to a neck band.


2013-03-23 17.21.24
 I then did 6 box pleats and elasticated the bottom to make it measure about half of my waist.


2013-03-30 17.21.16 A neck band (no idea of the right terminology here) was put together consisting of the lace, and interlining and an actual lining. The lace was sewn to the interlining and that was put right sides together with the lining . The curves were then clipped and it was turned the right way out.


2013-03-28 19.53.20A skirt was then put together using ……..
In the picture the collar (aha, that’s the terminology ) hadn’t been sewn together yet so it had a few inches taken off the width for the final thing. Ditto for the waistband, but you get the general idea of what it’s supposed to look like.
So I ripped up all the pieces and placed them onto my fabric (a gorgeous dusky rose pink satin) and they didn’t fit, plus I was slightly worried about working on the bias with the circle skirt bodice. Anyway it was back to the drawing board.


2013-04-13 18.10.05
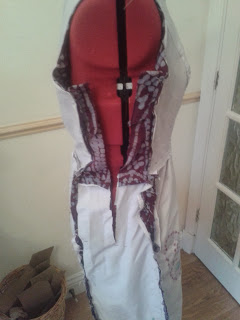
I looked at the dresses in my wardrobe and I saw a bodice with princess seams and had an “aha” moment. So I made up another bodice using simplicity 4070. I also took out several inches of the width of the skirt as I only have 3 metres of satin. It’s draping all wrong but that’s only because its a bit long for Millie, but once it’s hemmed it will be fine.
The arm holes needed to be cut down a bit more which I did later. Again the width of the collar is all wrong so the dress is out of proportion but you get the idea. I also took out several inches of the width of the skirt.
So this is the finished design for the prom dress and I’m fairly happy with it, although it’s not how I first envisioned it. The next step is to make a wearable muslin out of some fancier fabric so I can practice my princess seams and to make sure that I can deal with the slippery fabric.

Winter Dress


I thought it was about time to put down the summer garments, and to make something that I can actually wear without becoming an icicle. The ironic thing is that the day I took pictures it was really sunny, but it works just as well with a casual blazer and thick black tights. This bodice is from the Simplicity K4070 and the skirt is two gathered rectangles.There were lots of issues with this dress, but I soldiered on and am really happy with the end product. The only negative thing about it is that the skirt sticks to my legs when walking and I’m not quite sure how to rectify that.The insides are awful, and from now on I’m going to make them as neat as possible in every garment that I make.


I made up the lining, and then fitted it to Millie. As per usual several inches were removed from the bust area. I also cut the neck down a bit. The bodice was then taken apart and drawn onto grease proof paper. The main fabric was then cut out using the new pattern pieces.


I had slight fitting issues and the bodice was too small even after adjusting the pattern to fit better. To rectify the problem I cut out a really long trapezium shape and added that to the side of the dress, placing a zip on the right hand side. As you can see from the picture, this was an awful idea as a) it wasn’t straight and b) it was completely visible from the front view of the dress. So that was removed.


I then decided that it would be a better idea to cut a slit in the middle of the trapezium which was a much better placement for the zip.
The arm holes ended up being too tight so i cut about 1cm in and then turned it over to make it wider.
I attempted to line it, but it was unsuccessful as most of the raw edges were showing. Next time I have a better idea of how to put everything together.