A new silhouette

Hello all! The fabric for my latest Minerva make has had many incarnations in my head, and you get to see the version that made it all the way to the finish line. I've been working on my princess seam bodice block and combining it with a pencil skirt to make a dress pattern. The original next step was to swing out the skirt pieces to make a full skirt for this dress, but I was curious to try out this new silhouette to me so I left the new dress blocks as they were. You can read all about the making process on the Minerva Crafts blog here.
Thanks very much for reading, to Minerva Crafts for providing the materials for this project and to Grace for taking the pictures!
Lauren xx

Checked Shirt

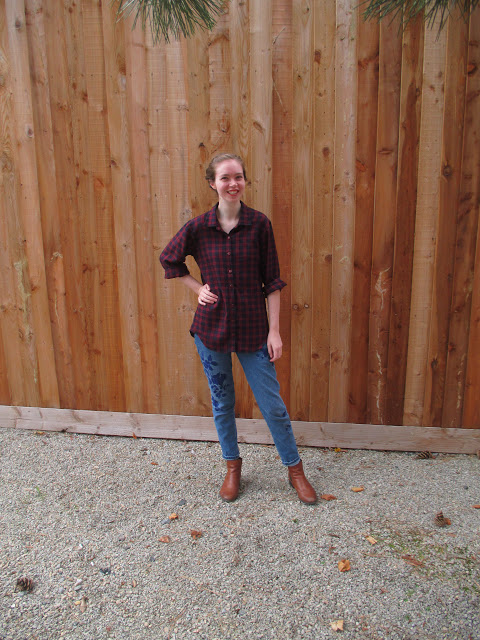
Hello all!  My third and final year of uni has started in full force ( I'm 3 weeks into making for the first show of the season) but this is one of the things I made to wear on my trip to Amsterdam before summer holidays had finished.
My wardrobe plan for Amsterdam was all about the layers. Jeans, plus a tank top, then a shirt, jumper and coat to be added or taken off when appropriate. This worked really well. The fabric I think is some kind of cotton blend that I bought in Birmingham with Ben last winter. The original plan was to make it into a dress but it's going to be worn a thousand times more as a shirt.
I used the men's shirt pattern that I drafted for uni last year and that I used for the white linen shirt I made a few months ago. This time I made the yoke a little longer and added seam allowance to the collar so it's much more in proportion. The only thing I'd change now is to widen the cuffs a bit.
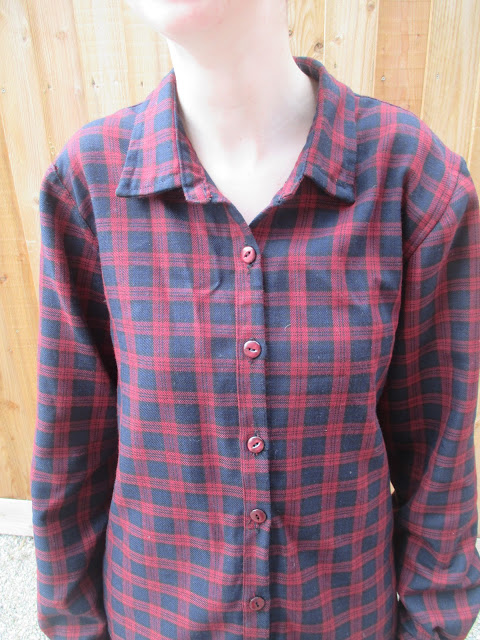
I paid particular attention to the pattern matching across the centre front, side seams and sleeve seams. Miraculously the collar actually matches the yoke, with no particular planning. The only change I'd make at the cutting out stage would be to centre the check at the pleat on the back piece. It looks a little off here.
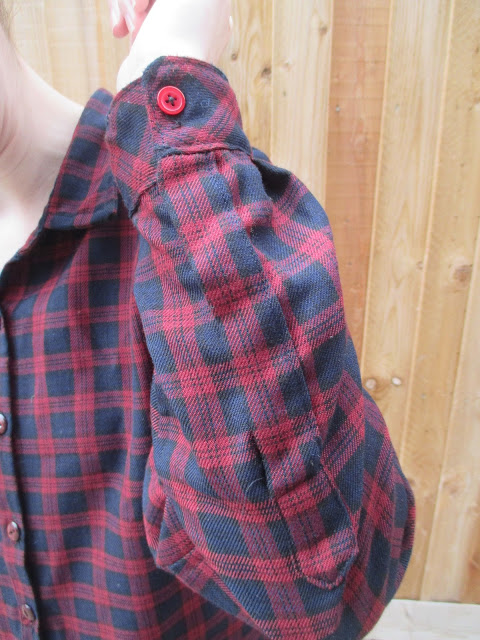
I did the proper plackets this time, and I'm slowly getting to grips with the technique. It really helps to have a ready to wear shirt in front of me so I can see what I'm aiming for. The placket could do with being a bit shorter, and so could the sleeve.
My biggest mistake with this shirt was to flatfell the seams on the left hand side of the shirt on the outside and the seams on the right hand side on the inside! At this point in the game it was too late to change it, and probably only people who sew will notice, but I know that I could have had a neater finish had both the sleeve seams been flatfelled on the inside. The hem didn't particularly like being folded over twice and topstitched and I wish that I had bias bound it.
Despite all of this, I love this shirt and will never take it off.
Thanks very much for reading and to Bethan for taking the photos!
Lauren xx

Ginger Jeans

Hello all, I've found myself wearing jeans more and more lately and so I wanted to expand my very limited collection. I used the Closet Case Files Ginger jeans pattern as a base. I always have my eyes peeled for good denim but I find it in the weight, colour and stretch I want quite hard to find. Luckily Minerva Crafts was there to save the day. I normally prefer lighter denim and I did consider bleaching this one when it arrived, but the darker denim is growing on me. You can read all about the making process here.https://www.minervacrafts.com/blogger-network/post/ginger-jeans-2
Lauren xx

Floral Tank Refashion

Hello all! Today's make is a refashion of a top I made all the way back in 2013. It was supposed to be a 5 minute jobby but turned into a one day saga. The neckline on the old top was too high which meant that it didn't get much wear and I decided that it was time to give it a makeover for my upcoming solo trip to Amsterdam next week (argghh!)  
I originally put the top on my dress form, pinned where I wanted the new neckline and straps to be, but that ended up just being a bit of a disaster. So then I went to my trusty pattern stash and dug up Simplicity 5461 (the dress pattern not the bear pattern) and used the tank pieces as a guide for a new neckline and armholes. After I cut the new neckline and armholes I realised that the neckline was far too low, revealing pretty much everything that shouldn't be revealed. I had 2 options: throwing it into the corner of the room and never speaking to it again, or just sticking back on the bit of the neckline that I had just cut off.
I went with option 2 because without it my Amsterdam capsule wardrobe would be nothing. So, off to the ironing board I went, butted the bit of the neckline that I had just cut off to the top with some interfacing underneath and ironed it into place. Then I was just left with some raw edges to hide. After a rummage around my ribbon drawers I found this vintage lace trim which I think was handworked by one of my Mums friends Mothers. It was a perfect accent to a pretty simple top.
I could have left the trim on just the front of the top, but the shoulders were a bit wide so I used the trim across the shoulders to keep them in place, crossing them at the centre back. The back neckline I kept the same as the original low neckline so you can imagine where that would sit on my front. The side seams were already French seamed and the hem turned up twice which saved me some time. The only finishing I had to do was silk bias binding around the neckline and armholes. It ended up pretty short due to all of the chopping, but it's a perfect length with these jeans. I'm sad that summer is over so I can't wear it as much as it deserves.
Thanks very much for reading and to Ed for the photos!
Lauren xx

Summer ball dress 2017

 Hello all! I've finally managed to get some pictures of my Summer Ball dress so let me tell you its story. I'll paint a picture for you: It's the end of the university year. Money has trickled out of the bank account until mere drops remain. There is no budget for fabric. There is no budget for alcohol. In these sad times one must make do and mend. I had two options. Option 1 was to make some kind of dress with the floral scuba I made my bikini from. Option 2 was to whack a bodice onto my gathered silver circle skirt, made a few months ago. I decided that now was the time to go big and have some fun.
I was told in no uncertain terms that top-to-toe silver would be too much, and turn me into the tin man from Wizard of Oz. In fact, this turned out to be quite a popular opinion. But, I had a vision and I was determined to see it through.
 In terms of construction for the midriff panel I used the pattern piece from Wearing History's Dahlia top pattern and I started off with 2 long triangles for the bust covering pieces. I first slipstitched the bottom of the midriff panel to the bottom of the existing skirt waistband. Then I put on the skirt, pinned the tops of the 2 triangles together to form a halterneck and tucked the ends of the 2 triangles into the skirt. My dear friend Bethan then plonked in the safety pins to determine the neckline, sidelines and attaching the bust bits to the midriff panel. Next I detached the bust bits, made the adjustments, lined them with some black chiffon I had lying around and sewed them onto the midriff panel.
Since the skirt was already finished, the bodice part really didn't take very long, although I would have really struggled with the fit without Bethan's help (Thank you Bethan!) It's certainly not a quiet piece of clothing, but then I'm not a very quiet person so perhaps we match each other quite well. The full skirt in particular was very good for the pimms induced dancing.
Thanks for reading and to Ed for taking pictures!
Lauren xx