Floral scuba Sophie bikini

Hello all! Today I'm going to share this years Sophie bikini with you. You can see last years here and this year I even managed to replace the pint sized paddling pool with the real deal! My friend thought I was braving the 7 hour Megabus to Wales for her but it was actually for those sweet sweet seaside pics.
This year I actually managed to acquire some foam (for the princely sum of £12.50 for half a metre) which was very painful to hand over the money for at the till seeing as I only needed 10cm worth. Let's say it's an investment for my next 10 years of bra/swimwear making. I also bought proper rubber elastic for the first time. Of course I failed to purchase enough, so had to make do with clear elastic for the rest. I only remembered about swimsuit clasps when I got home, so I stole this one from last years bikini.
 The pattern for the bikini bottoms was my standard pants pattern which was originally copied from one of my existing pairs of pants. Now I attempted to account for the fact that I was making these in scuba by adding 1cm to the waistline WHICH WAS NOT ENOUGH. Hence the added panel at the top. According to my Mother they look a bit tight, and as per, she is right. Probably should have sized up all over. They aren't circulation-cutting-off-tight though so perfectly wearable.
 In terms of the bikini top I had a few issues. Mostly because I'm an idiot and used the pattern pieces I had when testing the pattern before they were altered for the final version. I made a couple of  test versions of different cup sizes in the foam to double check sizes before committing to the fabric. I had SO much fun butting the edges of the foam together and zigzagging. Talking of fabric, I used scuba because it's what I had. I couldn't find any existing Sophie's made from scuba but it has been used by various people for underwear so I decided that was enough to go ahead. I ended up going up 3 cup sizes mainly because the foam lessens the stretch (I think?), pinched a bit of the gaping at the top cup out, recut and took some width out of the bridge to get what you see before you today.
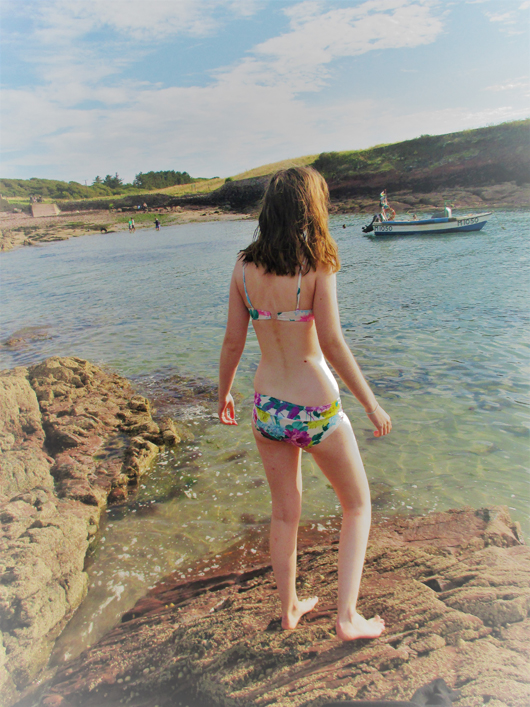
Said Welsh friend received a very up close and person video call to help me assess all aspects of fit. (Cheers MK.) Although it took a bit of trial and error to get it just right I'm pretty happy with what I've ended up with. It survived an (admittedly short) session of snorkelling, and what more can you ask of a swimsuit? The bridge doesn't lay flat but I'm not sure if that's because I didn't put wires in or if my boobs aren't big enough or if the fit is just wrong? Or maybe all 3. Anyway, it's the nicest bikini I've ever owned.
Thanks very much for reading and to MK and Paul for the photos,
Lauren xx

Ruffle Wrap Skirt

Hello all! Today I have a new skirt to share with you. It's not the quietest of skirts. In fact I'd go as far as to say that it makes quite a statement. I haven't quite decided whether I like the statement it makes or not, so please leave thoughts and opinions in the comments!
First lets talk about the fabric. This is a cotton that I crinkle dyed with flour not one but two whole summers ago. It was originally intended for a coat, but then I came to my senses and realised that there was in fact nothing less suitable to make a coat out of and so it was shelved until another million dollar idea hit. The million dollar idea didn't hit until a few months ago when I read this blog post. I loved the drama of the skirt and decided that I needed my own. A quick peruse of the stash led me to this beauty and I got cutting.
 I used a vintage wrap skirt pattern that I unfortunately can't name because I left it in London (I'm finally home for the summer, yay full fridge!) I cut the skirt with a high low hem and then added a massive gathered rectangle for the ruffle. A pro tip is to hem the gigantic rectangle before you attach it to the skirt. It turns out that the hem had quite a big circumference so the gigantic rectangle wasn't quite as gathered as I would have liked, but you've got to work with what you have.
 The skirt is simply wrapped around the body and tied at the side. I learnt on the walk to uni that there is a reason why there is a button to secure the wrap on the other side, because if it is not secured it will fall down and you will almost flash the world just when walking past the local primary school. I haven't finished the ruffle seam edge yet because I can't quite decide what I think of it. Is it beach appropriate only or can I somehow incorporate it into my summer wardrobe?
Anyway, thanks for reading as always. I hope that you are all having lovely summers/winters wherever you are. Thanks to Paul for the photos and MK for directing. We got some cracking poses in there.
Lauren xx

Black Linen Jumpsuit

Hello all! Sorry for my absence on the blog of late. I do have things to show you, it's just a matter of getting pictures! Please bear with me.mThis months Minerva Make is a linen jumpsuit. In my last term at uni I made a costume for a show that was put on in central London. Whilst the show was on, I was one of the dressers for the production. This mainly involved helping the actors get ready and helping with any costume changes that needed to be done during the show. The dress code for dressers is full blacks, and the week of the show it was boiling hot in London so I needed something to wear that covered most of my skin whilst still keeping me as cool as possible. My answer to this was a linen jumpsuit which I could easily whack a long sleeve t-shirt over the top of if I needed to. You can read all about the making process over at the Minerva blog here.

 Thanks very much for reading, to Minerva Crafts for all the supplies for this project and to Beth for taking the photos,
Lauren xx

Stripey jumpsuit and cropped blouse

Hello all! This months Minerva Make is a double whammy. A stripy jumpsuit and a white off the shoulder cropped blouse. The original plan was trousers and a white buttondown shirt, but my brain had other plans. You can read the whole story over here.
Thanks very much for reading, to Minerva Crafts for the supplies for this project and to Abby for taking the pictures!
Lauren xx