Navy Half-Circle Skirt

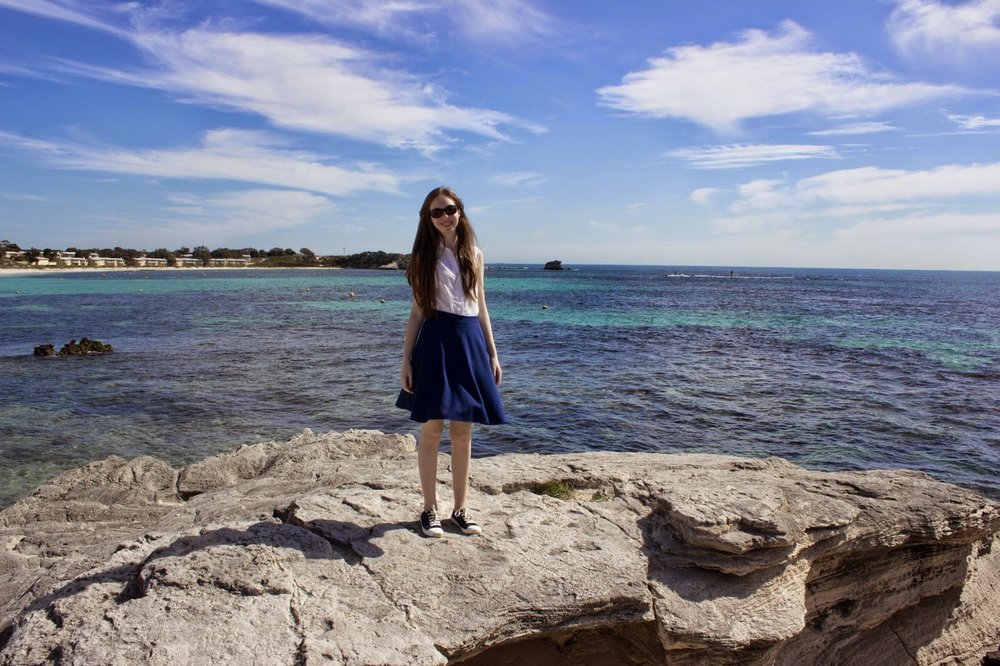
Hi all! Yup, I'm still working through my Australia outfit photos! Nearly done, promise. Today I have a half circle skirt to show you, along with the beautiful background beaches of Rottnest Island which we visited whilst staying in Perth.
This one of my basic necessities that goes with pretty much everything so was great for the holiday capsule wardrobe. I made it in a ponte so it's really comfy and no fastenings are needed. I do like to wear a petticoat underneath it to give it a bit of oomph.
I traced around my black half circle skirt for the basic shape and added a rectangular waistband. A really quick and easy make. I really need to get hold of some knit interfacing, which would make the waistband just that little bit more stable. The skirt is hem-less because I didn't want it to become all fluted and distorted so I think I'll invest in some hem tape next time around. It's fine as is though.
I do feel that the outfit is a bit too basic and plain, which could have been brightened up with jewelry? But I feel that the jewelry I own is a bit much for meandering down the beach. Something to think about, anyway.
Rottnest Island was beautiful to walk around, even more so because it was practically empty and we had the beaches to ourselves. It was pure bliss, probably the best day of the holiday, excepting Sydney fabric shopping day!

Thanks so much for reading and to Ed for taking photos!
Lauren xx

Floral Wrap Top

I know you've seen this fabric before in 2 different items, shorts and a bodice blogged here, but apparently it's the fabric that keeps on giving as I managed to squeeze this top out of it too. 
It was a very improvised top, basically a rectangle with a curve as shown in the embarrassing diagram that I made in Paint. You wouldn't believe how long it took me to draw it. a is the distance from shoulder to underarm. b is half the circumference of your hip measurement and c is shoulder to where you want the top to end. Then draw the curve where you want it. The back is a rectangle with a curve for the neck (not pictured)
After adding seam allowances cut 2 of the fronts out and a back. I then stay stitched each curve and neatened it with bias tape. Then I joined the I put the left front over the right front to make that Vneck and joined them together at the side seams and hem. The front was then attached to the back in the shoulders and side seams which were then overlocked. The arms holes were turned under twice and slipstitched and the hem was overlocked, turned under and slipstitched.

I do wear a singlet underneath it because the neckline is prone to slipping around which can be easily fixed by the use of a safety pin. Next time I'll make it a little longer as it's not very good at staying tucked in.
After looking at my jeans in these pics it's clear that I still have some tweaking to do!
That's it for now! Thanks for reading and to Ed for taking pics. These were taken in Mandurah, which is around an hour and a half away from Perth.
Lauren xx

Grecian Costume

My friends 18th birthday party was historically themed and I decided to go as a greek, because greek clothes have a simple elegance to them that I love. Most of my research came from a very useful book entitled "Costume and Fashion, a Concise History" by James Laver. Greek men and women wore the chiton throughout the 7th to 1st century BC, which was a basically a rectangle of fabric, folded around the body. Pins and brooches held it up and it was usually belted around the waist. The upper classes wore colours like red, yellow and green and decorations such as the greek fret were at the border only. 
From this information I drew up my design which is consists of 2 rectangles (one front and one back). The top edge of the rectangle was scalloped and buttons put at the point of each scallop. The rectangle was cinched around the waist with a belt. I was going to do some fabric printing of the greek fret around the hem with gold fabric paint but time was an issue so I decided it looked fine without. 

It really needs a belt to give it some definition.


The side seams were french seams and the armholes were turned twice and hand stitched in place using a slip stitch. To get clean scallops I used a facing for the top part of the rectangle using leftover fabric. 
The facing was all over the place so I stitched it down to make sure the scallops were the right shape. The buttons I found at my local market for I think 25p each?
The fabric is a rayon polyester blend that we found at a Textile Traders in Perth. I was originally going to go with chiffon for this dress because I wanted a really nice soft, flowy drape but this fabric jumped out at me so I decided to go with it instead. I bought 3 m which I basically cut into two 1.5m lengths for my rectangles. The fabric is really cool because the warp yarns are gold, giving it a really shimmery effect when it moves.
At this birthday party there was a bouncy castle, so I needed to adapt my dress somehow to be bouncy-castle-suitable. To do this I put a circle of elastic around my waist, tucked the hem into it and put my belt on top. Ta-da! It actually worked quite well, as long as I didn't bounce too vigorously...


That's it for now, thanks for reading and to Mum for taking quick photos before we dashed off to the party!
Lauren xx

Navy Archer

Happy Sunday everyone! (or whatever the day of the week it is when you're reading this) I decided that button down shirts were crucial to my travel wardrobe because they can be worn with skirts, dresses, trousers... EVERYTHING. Apart from dresses with sleeves. Hadn't thought that one through. The pattern that I used is of course Grainline Studios Archer button down shirt.
 There was a considerable armhole gape as there was last time but this time I solved it by taking it in at the side seam and tucking the gape-age under the back yoke seam, slip-stitching it in place. I think it worked okay, but I took a little too much out at the side seams making the armhole a little too tight.
The shorts of course are from my two piece floral playsuit, blogged here. The buttons are a contrasting white because I lost the navy buttons I bought and we were leaving in 2 days. Taking it in so much at the top of the side seam makes it quite A-line in shape but that's okay because I only really wear it tucked in or tied at the waist. If I lengthened it it would make a cute summer dress though.
The fabric was a navy valence from the charity shop for 1.50. 50% polyester and 50% cotton, but if feels fine and was okay to wear in the hot weather so that's okay. I still have loads left to do something else with.
Thanks very much for reading and thanks to Dad for taking them in Singapore for me!
Lauren xx

Purple Marbled Playsuit

This playsuit was made in a hurry the night before we left for Australia because the holiday simply would not be the same without it. The first week of the summer holidays I spent doing work experience at a local fabric shop which was quite frankly like being in heaven. I'd take my projects and sew in between customers. As a thank you I had my pick of the remnant basket. I chose this 70cm long piece of marbled cotton and another cotton with little black flowers printed on a red background.
It was a real squeeze to fit it into 70cm but I did it! The pattern was drafted on the fly using my culotte pattern as a base. 5 cm was added to the waist so it would be okay for a playsuit. I got my hip measurement and added a few cm's of ease. 1/4 of this measurement was the width of the culotte waist and the bodice, so I could get it over my hips. The height of the bodice rectangle was from my armpit to waist. I then added elastic to the waist the length of my waist circumference to give it a bit of shape.
It was designed to have a V-neck but it gaped a lot so I stretched elastic over the area to create gathers instead. It ended up being really low cut so to protect my modesty I made a facing which could be safety pinned to the inside of my bra to make sure it stayed in place. It actually works really well! You can see a bit of the facing which popped out in the pic below. Oops! I didn't have enough fabric left for scraps so used a purple ribbon I had in my stash instead. I cut it into 4 with a view to tying each of them up but they ended up too short. I double knotted them too loosely and so now they have to be tucked around my bra strap to stay in place. 
It's funny that these culottes have much more of an A line shape than my knit culotte playsuit because this fabric is stiffer. Next time when I have more fabric to play with I'll slash and spread to make them a bit more voluminous so they have more of a circle skirt kinda drape. I'll also add a bit more ease to my hip measurement because this playsuit takes a fair bit of wriggling to get on and off!

Thanks very much for reading and for Dad and Ed for taking fabby beach pics.
Lauren xx