Brocade Birthday Dress

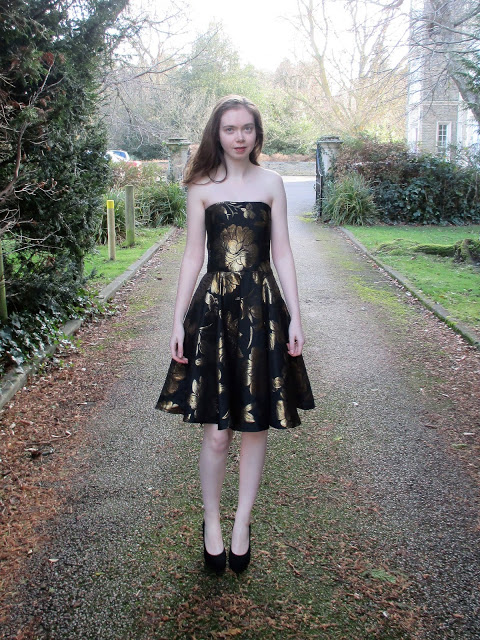
Hello all! This month's Minerva make is a bit fancy. It was my 21st birthday last week and I wanted to make something special to wear. I love black and gold as a colour combo so I chose this metallic brocade to make my dress with. When it arrived however, I was a bit stumped as to what to do with it, as the scale of the print was much larger than I expected. From then on the design consisted of breaking up the print as little as possible. You can read all about the making process on the Minerva Crafts Blog here.


Thanks for reading, to Bethan for the photos and to Minerva Crafts for providing the supplies for this project!
Lauren xx

I made a hat!

Hello all! I have another, slightly off-piste thing that I made to share with you. After watching the recent BBC adaptation of Howards End I found myself incomplete without a beret of some description. You can see a picture of the main motivator here. One day I’d like to knit a beret much like the original specimen but when I was sorting through my sewing patterns and unearthed a hat pattern who was I to stand in the way of fate?

IMG_2381 (2)e.jpg


It took no time at all to cut out, being made up of a circle for the top and a doughnut shape for the underneath. One of each was cut out of the main fabric, lining and interfacing. I used some black wool from the stash for the outer and a wine coloured lining for the inside.

26829446_1575211262557848_1830844631_osm.jpg


For the hat band I used an inch wide cotton tape that was folded in half and topstitched onto the inside circle of the aforementioned doughnut. The pattern said nothing about elastic but I want this hat to stay on my head so I added that into the band just in case. (After being worn around a windy Vienna I was very glad of this forethought). 


IMG_2383 (2)e.jpg

After a quick trying on before adding the band I wasn't a fan of how the hat was sitting. I should note that I wasn't entirely sure how it should sit, being fairly new to the world of hats, but I knew that something had to be done if it was ever to be worn. I decided to rip out the interfacing which just made the whole thing far too stiff, and plump instead for a more floppy effect. I also made the head hole a bit bigger so it would fit on my head a bit more.

IMG_2389 (2)esm.jpg


After the hat was done I decided that it was lacking a pompom, so I hunted out some black wool from the back of the wardrobe and made a pompom with the side of 2 cardboard doughnuts. This was then sewn onto the middle of the hat. When I look at the pompom now could have been a bit mightier, but I love it just the same. All in all, the process took me an evening and was a perfect palette cleanser before tackling some more involved makes. I still haven't decided whether I like how it looks on my head, but I do know that it keeps me warmer than I would be if I were not wearing it, so surely that makes it a winner.

IMG_2386 (2)esm.jpg

Thanks for reading!

Lauren xx

Padme Battle Outfit

Hello all! Today I have a project that's a bit different (and a bit tighter than usual) to share with you. My friends have a costume party for their birthday every year and we all have to show up dressed as something beginning with the letters M, K, P, R or J. (The first letters of all the names of the birthday folk). Last year I made a leotard and tutu with a tenuous 'Prima Ballerina' link. This year I went more feisty. I went for Padme, after recently re-watching the Star Wars prequels and admiring her character. As per usual, I had a limited time and budget, which narrowed my costume choice down quite considerably. I went for Padme's battle outfit in Attack of the Clones which had some interesting details, but was still pretty achievable fabric-wise, drafting-wise and construction-wise. 

padme3.jpg

When I met up with ClaireVicki and Bea for fabric shopping in London I found this off-white lycra fabric that seemed perfect for the job. I think I bought 1.5m for £10. I also bought white strapping and a buckle for the belt, which I tea dyed later along with fabric scraps for the pouches so they'd match the more beige colour in the reference photos. The only other material I bought was duct tape for the armbands. The whole outfit cost less than £15 to make. 

padme4.jpg

 I found the Padawan's Guide an invaluable reference to see the costume close up and work out all the design features. I used my leotard block as a base and drew on the design lines. I then cut along all of those lines and the resulting pieces became my pattern pieces. The construction of the top was actually really straight forward. I expected to have trouble with all of the corners (all 6 of them) but they all went absolutely fine. The seam allowances were topstitched down with 2 rows of topstitching. The whole thing was a tad tight so I re-sewed all of the seam allowances as tiny as I could and then it fit fine. I do wish that I had done tiny French seams on the outside of all of the top panel seamlines just to make them a tad more pronounced. My only issue with this top is that the lycra is slightly too see through to wear without a bra, but there isn't enough of the back of the top to cover a bra with all of the rips. I tried lining the top with a beige double knit but that didn't do much. In the end I resorted to just sticking foam cups up there, but I'd quite like a less obvious solution.

padme1.jpg

 For the back of the bodice I cut the rips whilst looking at the production photos. I wish I'd cut the lower rip a little wider so you could see more of the claw mark. I made myself a little lycra armband for the arm with no sleeve just less the width of the duct tape and I put the duct tape over the top so ripping it off after the party wouldn't be agony. (Shout-out to Paul for doing my armbands on the party night and to MK for felt-tipping in my wounds)

padme5.jpg

 It turned out that the leggings were actually the tricky part. I made the mistake of cutting them with the stretch going upwards, instead of around the legs, which meant that I couldn't even get them over my calves, even with all the SA at a minimum 1/8".

I didn't have enough fabric to recut, so another solution had to be found. As there's 4 panels in each leg (I added in a centre front and back seam to each leg in accordance to the production photos) I took out one of the panels in each leg, cut a wider one and added that in the smaller panels place. The fit above the knee is now pretty good, but the adding in of a wider panel has completely distorted the legs so the seams twist around the leg instead of standing straight. I'd quite like to re-do the leggings with the stretch going in the right direction if I can get hold of some more fabric. 

padme6.jpg

 After various discussions about what I could add to my belt I kept it simple with a phone case on one side and a place to hold my gun in the other. Surprisingly at uni my stock of toy guns was non-existent so my brother kindly posted one of his nerf gun collection from home. Ideally I would have sprayed it silver, or found a slightly more streamlined model, but beggars can't be choosers. A drinks cup holder would have been great, but I feel would have caused more issues than solutions. The shoes are actually a new addition to the outfit. On the night I wore cream slipper socks because it was a house party and I didn't have anything else suitable. Obviously these shoes aren't perfect, but at least you can say that they co-ordinate, and they can be worn outside of the house.

So, that's my Padme costume. I actually love it to pieces. I think it looks really fierce, and it was a really fun challenge to construct.

padme2.jpg

Thanks so much for reading!

Lauren xx

A British Outfit: Making the bra

Hello all! Today I'm going to talk through the process of making my British bra. Many many hours of hand sewing went into this bra in an attempt to make the insides look as good as possible. 

Firstly, the thread I used for this project was an old Dewhurst Sylko wooden reel found in the back of a cupboard. It's labelled as a silk substitute made in Great Britain with fast dye. The shade is D.25 Violet, which luckily contrasts beautifully with my bra fabric. The silk substitute is likely to be rayon or polyester and the dye used was definitely a chemical one. Unfortunately the thread is the only product that I have had to compromise on so far as none appears to be manufactured from start to finish in the UK and be able to be used on a sewing machine. Of course I could have used the fibres from my fabric and sewed it all by hand, but I don't have the time to for that to be an option, so a thread that was at least partially manufactured in Great Britain was as close as I could get for this item of clothing. I will be exploring different thread options with the other garments still to be made as part of this project. 

When it came to cutting out in the final fabric I was very conscious of where I placed my pattern pieces and tried to keep the splotches of colour as evenly spaced as possible. The sewing lines were tacked in place using the aforementioned thread. 

 I tacked the whole thing together for the final fabric fitting and the only changes I made were to take in some excess at the side seam of the cups and add some length to the straps because the back was riding up slightly.

Below shows where the excess was pinned out. The new lines were tacked in and resewn. 

To finish the inside edges I folded the SA once and then again to hide the raw edge, and this fold was slipstitched down. In retrospect they do look a bit wide and I wonder whether I could have made them any smaller and more delicate. To finish the bottom edge I used a strip of self-fabric bias binding. I understitched it by hand because I didn't want the sewing machine to warp the delicate silk. The bias binding was then folded up twice and slipstitched into place. 

 For the top edge, the best way to deal with the corners was to press down the SA of the main fabric and then slipstitch the edge of the fabric to the edge of the bias binding which gave me a lot more control around the corners. Again the bias binding is a bit wide, and a thinner version would have been more delicate.

 I used

this tutorial from Kat Makes

to make the bra clasps from the

DIY hook and eyes

that Zoe made as explained in the previous blog post. And just like that, my bra was finished.

Thanks very much for reading!

Lauren xx