I made a hat!

Hello all! I have another, slightly off-piste thing that I made to share with you. After watching the recent BBC adaptation of Howards End I found myself incomplete without a beret of some description. You can see a picture of the main motivator here. One day I’d like to knit a beret much like the original specimen but when I was sorting through my sewing patterns and unearthed a hat pattern who was I to stand in the way of fate?

IMG_2381 (2)e.jpg


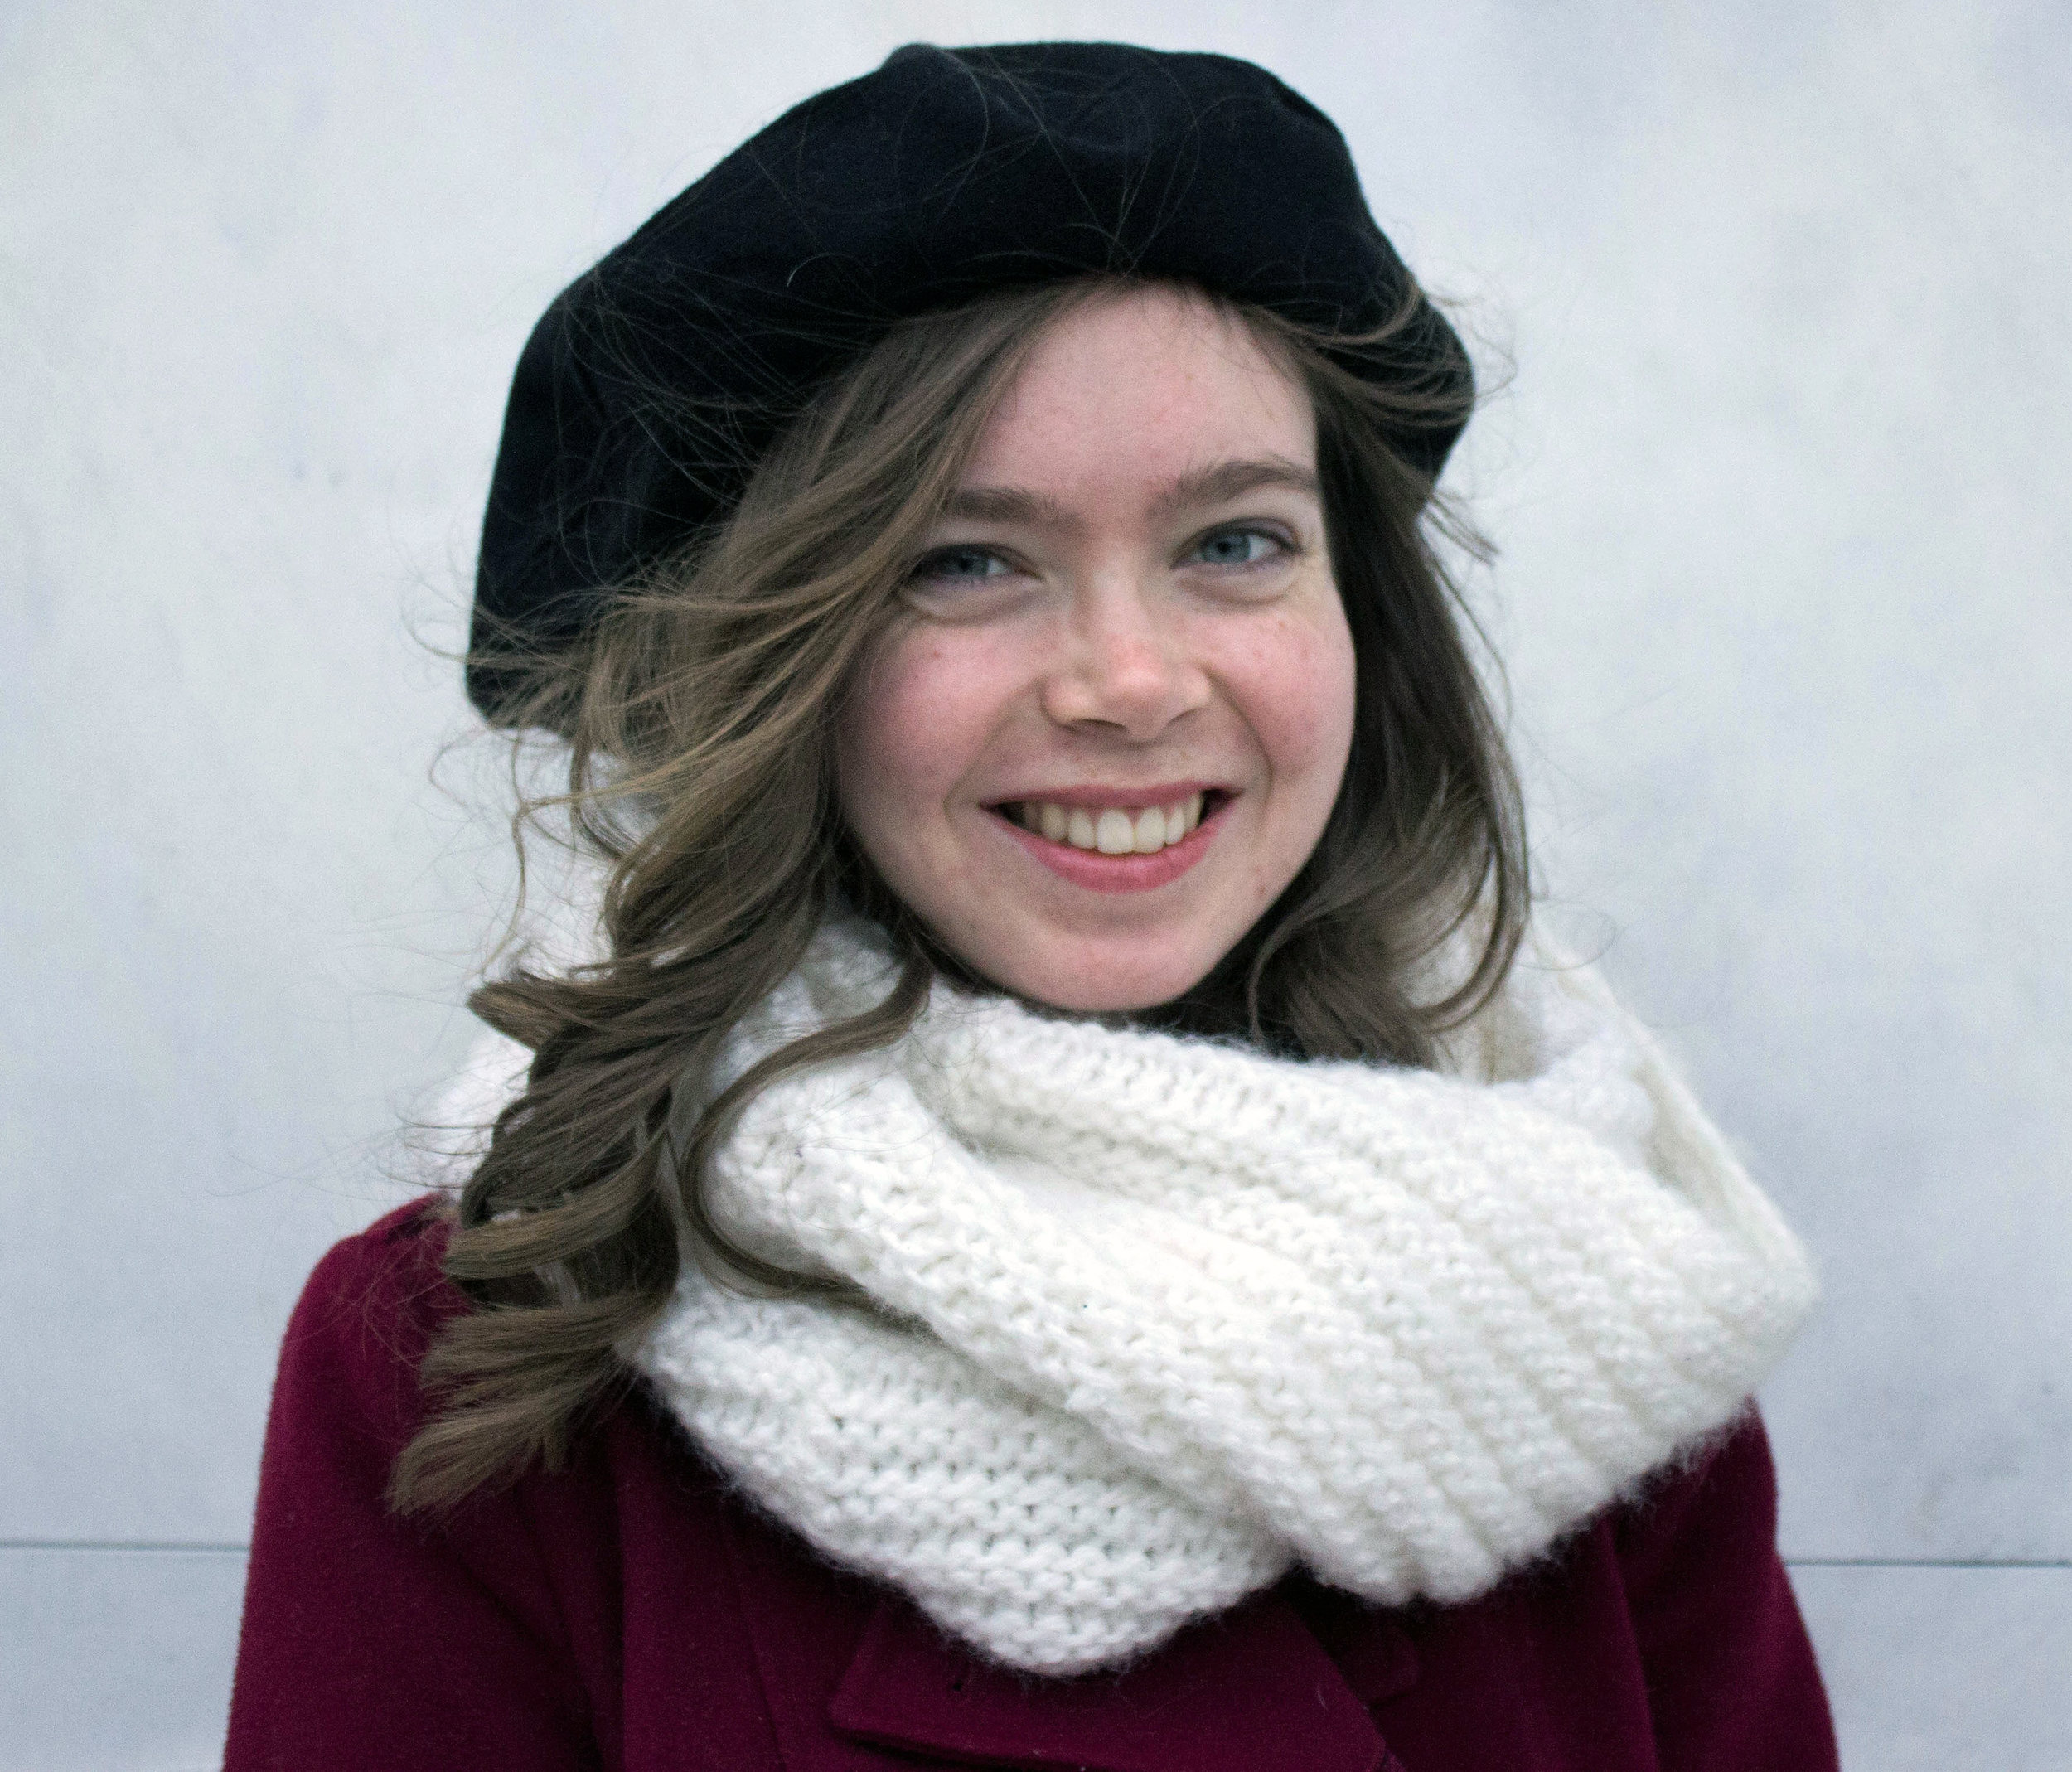
It took no time at all to cut out, being made up of a circle for the top and a doughnut shape for the underneath. One of each was cut out of the main fabric, lining and interfacing. I used some black wool from the stash for the outer and a wine coloured lining for the inside.

26829446_1575211262557848_1830844631_osm.jpg


For the hat band I used an inch wide cotton tape that was folded in half and topstitched onto the inside circle of the aforementioned doughnut. The pattern said nothing about elastic but I want this hat to stay on my head so I added that into the band just in case. (After being worn around a windy Vienna I was very glad of this forethought). 


IMG_2383 (2)e.jpg

After a quick trying on before adding the band I wasn't a fan of how the hat was sitting. I should note that I wasn't entirely sure how it should sit, being fairly new to the world of hats, but I knew that something had to be done if it was ever to be worn. I decided to rip out the interfacing which just made the whole thing far too stiff, and plump instead for a more floppy effect. I also made the head hole a bit bigger so it would fit on my head a bit more.

IMG_2389 (2)esm.jpg


After the hat was done I decided that it was lacking a pompom, so I hunted out some black wool from the back of the wardrobe and made a pompom with the side of 2 cardboard doughnuts. This was then sewn onto the middle of the hat. When I look at the pompom now could have been a bit mightier, but I love it just the same. All in all, the process took me an evening and was a perfect palette cleanser before tackling some more involved makes. I still haven't decided whether I like how it looks on my head, but I do know that it keeps me warmer than I would be if I were not wearing it, so surely that makes it a winner.

IMG_2386 (2)esm.jpg

Thanks for reading!

Lauren xx

Padme Battle Outfit

Hello all! Today I have a project that's a bit different (and a bit tighter than usual) to share with you. My friends have a costume party for their birthday every year and we all have to show up dressed as something beginning with the letters M, K, P, R or J. (The first letters of all the names of the birthday folk). Last year I made a leotard and tutu with a tenuous 'Prima Ballerina' link. This year I went more feisty. I went for Padme, after recently re-watching the Star Wars prequels and admiring her character. As per usual, I had a limited time and budget, which narrowed my costume choice down quite considerably. I went for Padme's battle outfit in Attack of the Clones which had some interesting details, but was still pretty achievable fabric-wise, drafting-wise and construction-wise. 

padme3.jpg

When I met up with ClaireVicki and Bea for fabric shopping in London I found this off-white lycra fabric that seemed perfect for the job. I think I bought 1.5m for £10. I also bought white strapping and a buckle for the belt, which I tea dyed later along with fabric scraps for the pouches so they'd match the more beige colour in the reference photos. The only other material I bought was duct tape for the armbands. The whole outfit cost less than £15 to make. 

padme4.jpg

 I found the Padawan's Guide an invaluable reference to see the costume close up and work out all the design features. I used my leotard block as a base and drew on the design lines. I then cut along all of those lines and the resulting pieces became my pattern pieces. The construction of the top was actually really straight forward. I expected to have trouble with all of the corners (all 6 of them) but they all went absolutely fine. The seam allowances were topstitched down with 2 rows of topstitching. The whole thing was a tad tight so I re-sewed all of the seam allowances as tiny as I could and then it fit fine. I do wish that I had done tiny French seams on the outside of all of the top panel seamlines just to make them a tad more pronounced. My only issue with this top is that the lycra is slightly too see through to wear without a bra, but there isn't enough of the back of the top to cover a bra with all of the rips. I tried lining the top with a beige double knit but that didn't do much. In the end I resorted to just sticking foam cups up there, but I'd quite like a less obvious solution.

padme1.jpg

 For the back of the bodice I cut the rips whilst looking at the production photos. I wish I'd cut the lower rip a little wider so you could see more of the claw mark. I made myself a little lycra armband for the arm with no sleeve just less the width of the duct tape and I put the duct tape over the top so ripping it off after the party wouldn't be agony. (Shout-out to Paul for doing my armbands on the party night and to MK for felt-tipping in my wounds)

padme5.jpg

 It turned out that the leggings were actually the tricky part. I made the mistake of cutting them with the stretch going upwards, instead of around the legs, which meant that I couldn't even get them over my calves, even with all the SA at a minimum 1/8".

I didn't have enough fabric to recut, so another solution had to be found. As there's 4 panels in each leg (I added in a centre front and back seam to each leg in accordance to the production photos) I took out one of the panels in each leg, cut a wider one and added that in the smaller panels place. The fit above the knee is now pretty good, but the adding in of a wider panel has completely distorted the legs so the seams twist around the leg instead of standing straight. I'd quite like to re-do the leggings with the stretch going in the right direction if I can get hold of some more fabric. 

padme6.jpg

 After various discussions about what I could add to my belt I kept it simple with a phone case on one side and a place to hold my gun in the other. Surprisingly at uni my stock of toy guns was non-existent so my brother kindly posted one of his nerf gun collection from home. Ideally I would have sprayed it silver, or found a slightly more streamlined model, but beggars can't be choosers. A drinks cup holder would have been great, but I feel would have caused more issues than solutions. The shoes are actually a new addition to the outfit. On the night I wore cream slipper socks because it was a house party and I didn't have anything else suitable. Obviously these shoes aren't perfect, but at least you can say that they co-ordinate, and they can be worn outside of the house.

So, that's my Padme costume. I actually love it to pieces. I think it looks really fierce, and it was a really fun challenge to construct.

padme2.jpg

Thanks so much for reading!

Lauren xx

A British Outfit: Making the bra

Hello all! Today I'm going to talk through the process of making my British bra. Many many hours of hand sewing went into this bra in an attempt to make the insides look as good as possible. 

Firstly, the thread I used for this project was an old Dewhurst Sylko wooden reel found in the back of a cupboard. It's labelled as a silk substitute made in Great Britain with fast dye. The shade is D.25 Violet, which luckily contrasts beautifully with my bra fabric. The silk substitute is likely to be rayon or polyester and the dye used was definitely a chemical one. Unfortunately the thread is the only product that I have had to compromise on so far as none appears to be manufactured from start to finish in the UK and be able to be used on a sewing machine. Of course I could have used the fibres from my fabric and sewed it all by hand, but I don't have the time to for that to be an option, so a thread that was at least partially manufactured in Great Britain was as close as I could get for this item of clothing. I will be exploring different thread options with the other garments still to be made as part of this project. 

When it came to cutting out in the final fabric I was very conscious of where I placed my pattern pieces and tried to keep the splotches of colour as evenly spaced as possible. The sewing lines were tacked in place using the aforementioned thread. 

 I tacked the whole thing together for the final fabric fitting and the only changes I made were to take in some excess at the side seam of the cups and add some length to the straps because the back was riding up slightly.

Below shows where the excess was pinned out. The new lines were tacked in and resewn. 

To finish the inside edges I folded the SA once and then again to hide the raw edge, and this fold was slipstitched down. In retrospect they do look a bit wide and I wonder whether I could have made them any smaller and more delicate. To finish the bottom edge I used a strip of self-fabric bias binding. I understitched it by hand because I didn't want the sewing machine to warp the delicate silk. The bias binding was then folded up twice and slipstitched into place. 

 For the top edge, the best way to deal with the corners was to press down the SA of the main fabric and then slipstitch the edge of the fabric to the edge of the bias binding which gave me a lot more control around the corners. Again the bias binding is a bit wide, and a thinner version would have been more delicate.

 I used

this tutorial from Kat Makes

to make the bra clasps from the

DIY hook and eyes

that Zoe made as explained in the previous blog post. And just like that, my bra was finished.

Thanks very much for reading!

Lauren xx

A British Outfit: DIY Hook and Eyes

Hello all, for this post I'm going to hand you straight over to Zoe!

Hello! My name is Zoe and I’m one of Lauren’s classmates. I’ve known Lauren for 3 years now as we started our time at Rose Bruford together. Hopefully you’ve all been keeping up with Lauren’s ‘A British Outfit’ series as this is what this post is all about!

The silver hook and eyes on top were made by Zoe and the bottom hooks and eyes were the reference point

At the end of our course, as you may know, we are required to do a dissertation style project which can be practical. The variety of things that have been chosen to be researched this year has been fascinating but Lauren’s research area has particularly interested me. It’s a concept that’s never crossed my mind before but has been a fascinating process to watch! As a result I have naturally offered my services for anything she may possibly need. One of the biggest challenges I’ve seen come up so far has been acquiring things that are now completely made overseas.

One day I walked into our workroom to find Lauren and one of our lecturers slaving away with some pliers and a great deal of frustration over the topic of making hooks and eyes for one of Lauren’s garments. After watching for a while, I and another classmate sat watching quite intently with a burning desire to give it a go. After around half an hour of sore fingers and mild swearing, I added my attempts to the pile for elimination once everyone had produced their finest work.

My attempts at making hooks and eyes

Unsurprisingly, from every angle the pile of our finest work looked incredibly sad. None of us were expert metal workers or mass producing machines. After having a long hard look at all of the attempts, the final decision was made and my hooks and eyes were the most normal looking. One of our other colleagues described mine selection as ‘the ugly ones from a regular box’ which was quite bittersweet and very funny.

Anyway, Lauren figured you would love to know how I did it! One thing to remember before going into this project is that your hooks and eyes won’t be perfect. You aren’t a machine. Each one will be unique but that’s part of the beauty.

This is what you will need!

Wire

(British/country of choice). One metre should be enough for practices and then the real deal.

Ormiston wire

very kindly send me a sample to play with.

Tiny pliers!

The main pair of pliers that we used were borrowed from someone who got them from a Christmas cracker.

Hooks and eyes

for reference

Second pair of small pliers

(optional) I’ve put a second pair of pliers as optional because at some points when I was trying to even out what I’d made, it was easiest to hold the fastening with one pair and bend with the other.

To make the hooks

Step 1.

Make a guide.

To make the hooks and eyes around the size of a standard box, I made the guide around 2cm with a third mark at 2.5cm long. Remember this is a rough guide! The picture below doesn’t have the third guide mark, at the time I just guessed.

Step 2.

Holding the wire

Pick up the end of your wire with your pliers. To get the best shape here don’t let the wire pop out the other side of the pliers. If you can start the end of the wire in the middle of the pliers jaws.

Step 3.

Making the loops

What you need to do here is curl the wire as tightly as possible around the jaws of the pliers. This will give you a tight loop that you will use to see the hooks and eyes down with. Once you’ve made the first loop, hover the wire over your guide and cut the wire at the 2.5cm mark. After this repeat step 3 to make the second loop on the other side. Your curled wire should sit roughly within the 2cm guide nicely. Unless it’s quite a lot out this isn’t a big issue if it doesn’t fit. You may need to tighten the loops you make by using the pliers to push the loops into the long bits of wire This is what mine looked like after tightening the loops.

Step 4.

Creating the point

At this point, it’s time to create the point that will make the hook. Roughly find the middle of the wire and bend the two ends together creating, what I’ll admit looks like quite a phallic shape. The closer in length the two ends are to each other the better.

 Use the pliers to make the point as tight as possible without creating a sharp point. The two loops may start to cross over and if this happens use your fingers to lightly pull them away from each other enough so that they sit close together but don’t overlap.

Step 5.

Creating the hook

This is the final step! Find the rough middle of the point you’ve created and bend it towards the loops creating the hook. If the hook is at an obtuse angle, use the pliers on the point end and press to close the gap enough so that it would work as a functioning fastening. And there you have your own hand made hook!

To make the eyes

Step 1.

Cut the wire

Go back to the guide we made for the hooks. Cut a piece of wire to be around 2cm long using the guide.

Step 2.

Making the loops

Just like for the hooks, hold the end of the wire in the middle of the pliers jaws. As tightly as possible bend the wire around the pliers creating a loop. Repeat this on the other side of the the wire and then nip the ends of the loops to tighten them up.

Step 3.

Making the eye

This bit is the hardest bit. Start by putting the middle of the wire in the jaws of the pliers and lightly bending. Move the wire slightly to one side and lightly bend. Repeat this on both side until you have a gradual curve over the eye. 

Once you’re able to get the loops into the jaws of the fliers both together this step is complete.

Step 4.

Finishing the eye

Once the gradual curve has been made, use the pliers to tighten the bottom by pushing the loops together. They don’t need to be tightened up a large amount, just to your personal preference using the premade eye as a reference. And there you have your hook and eye! Good luck with making your own hooks and eyes and hope this was helpful!

DIY hook and eyes on top and reference hook and eyes below

Thank you for reading, and huge thanks to Zoe for putting this tutorial together!

Lauren xx